Dry Rub For Ribs
If you have been searching for that secret ingredient that makes everyone lick their fingers at the BBQ, this is it! My homemade dry rub balances sweet brown sugar with a kick of heat to create the perfect caramelized ‘bark’ on your ribs.
5 minutes
0 minutes
5 minutes
1 Cup (Enough for 3-4 racks of ribs)
Seasoning
Mixing
American BBQ
Gluten Free
Hey friends! Welcome back to my kitchen. Today, we are tackling one of the absolute pillars of summer cooking: The Rib Rub. Put down that overpriced jar from the grocery store aisle. Seriously, put it back! We are going to make something ten times better with spices you probably already have sitting in your pantry right now.
There is something so magical about smoking or grilling ribs. The smell of the charcoal, the kids running around the yard with sticky faces, and the anticipation of that first bite. But let’s be real—ribs are only as good as the seasoning you put on them. I used to be intimidated by making my own spice blends, thinking there was some wizardry involved. Turns out, it is just about getting the ratio right.
This recipe is my absolute go-to. It is what I call a ‘crowd-pleaser’ blend. It has enough brown sugar to get that gorgeous, dark, caramelized crust (we call that the bark in the BBQ world), but enough savory notes from garlic and onion to keep it from tasting like candy. Plus, a little secret weapon: smoked paprika. It is a total game-changer! Whether you are slow-cooking in the oven or throwing these on the smoker for six hours, this rub is going to elevate your dinner game.
History & Origins
Let’s take a little history detour! Dry rubs are deeply rooted in American BBQ culture, specifically tracing back to Memphis, Tennessee. In the world of barbecue, there is a friendly (but fierce) rivalry between ‘wet’ ribs and ‘dry’ ribs.
Memphis-style ribs are traditionally served ‘dry,’ meaning the flavor comes entirely from the spice rub applied before cooking, without being slathered in sauce afterwards. The spices cook down with the fat of the meat to create a crust that is packed with flavor. While other regions like Kansas City rely heavily on thick, molasses-based tomato sauces, the dry rub method allows the quality of the meat and the smoke to really shine through. This recipe borrows heavily from that tradition but adds a touch of sweetness that is a bit more universal, bridging the gap between a spicy dry rib and a sweet glazed one.
Why This Recipe Works
So, why does this specific blend work so well? It is all about the science of flavor balancing and chemical reactions during cooking.
- The Maillard Reaction: The brown sugar in this mix isn’t just for sweetness. Under heat, sugar caramelizes and interacts with the amino acids in the meat. This creates that dark, mahogany color and complex flavor profile known as the ‘bark.’
- Moisture Retention: Salt is a hygroscopic agent. It draws moisture out initially, mixes with it, and then gets re-absorbed into the meat, carrying the flavors of the garlic and onion deep into the muscle fibers. This process, essentially a dry brine, ensures your ribs are juicy, not dry.
- Smoke Mimicry: Smoked paprika provides a chargrilled flavor even if you are just cooking these in your kitchen oven. It tricks the palate into thinking you spent all day over a wood fire.
Why You’ll Love This Recipe
- ✓Ready in less than 5 minutes
- ✓Uses common pantry staples
- ✓Perfect balance of sweet, savory, and spicy
- ✓Creates a professional-level ‘bark’
- ✓Customizable heat level
- ✓Much cheaper than store-bought blends
Equipment You’ll Need
- ✓Medium mixing bowl
- ✓Whisk or fork
- ✓Measuring cups and spoons
- ✓Airtight mason jar or spice container
Ingredients
- ✓1/2 cup Dark Brown Sugar (packed)
- ✓1/4 cup Smoked Paprika (do not use regular paprika!)
- ✓1 tablespoon Kosher Salt (use less if using table salt)
- ✓1 tablespoon Garlic Powder
- ✓1 tablespoon Onion Powder
- ✓1 tablespoon Ground Black Pepper (freshly cracked is best)
- ✓1 teaspoon Dry Mustard Powder
- ✓1 teaspoon Chili Powder
- ✓1/2 teaspoon Cayenne Pepper (optional, for heat)
- ✓1/2 teaspoon Ground Cumin
Instructions
- Prepare the Sugar: Start by measuring out your dark brown sugar. If it is clumpy, use your fingers or the back of a fork to break up any hard lumps. This is crucial because you want an even distribution of sweetness.
- Combine Ingredients: In a medium-sized mixing bowl, add the brown sugar, smoked paprika, kosher salt, garlic powder, onion powder, black pepper, mustard powder, chili powder, cayenne, and cumin.
- Whisk It Up: Use a whisk to vigorously mix the spices together. Ensure the brown sugar is fully incorporated with the finer powders. The mixture should look uniform in color—a beautiful reddish-brown.
- Taste Test: Dip a clean finger in and give it a tiny taste. Too sweet? Add a pinch more salt or cayenne. Too spicy? Add another tablespoon of brown sugar. This is the beauty of homemade!
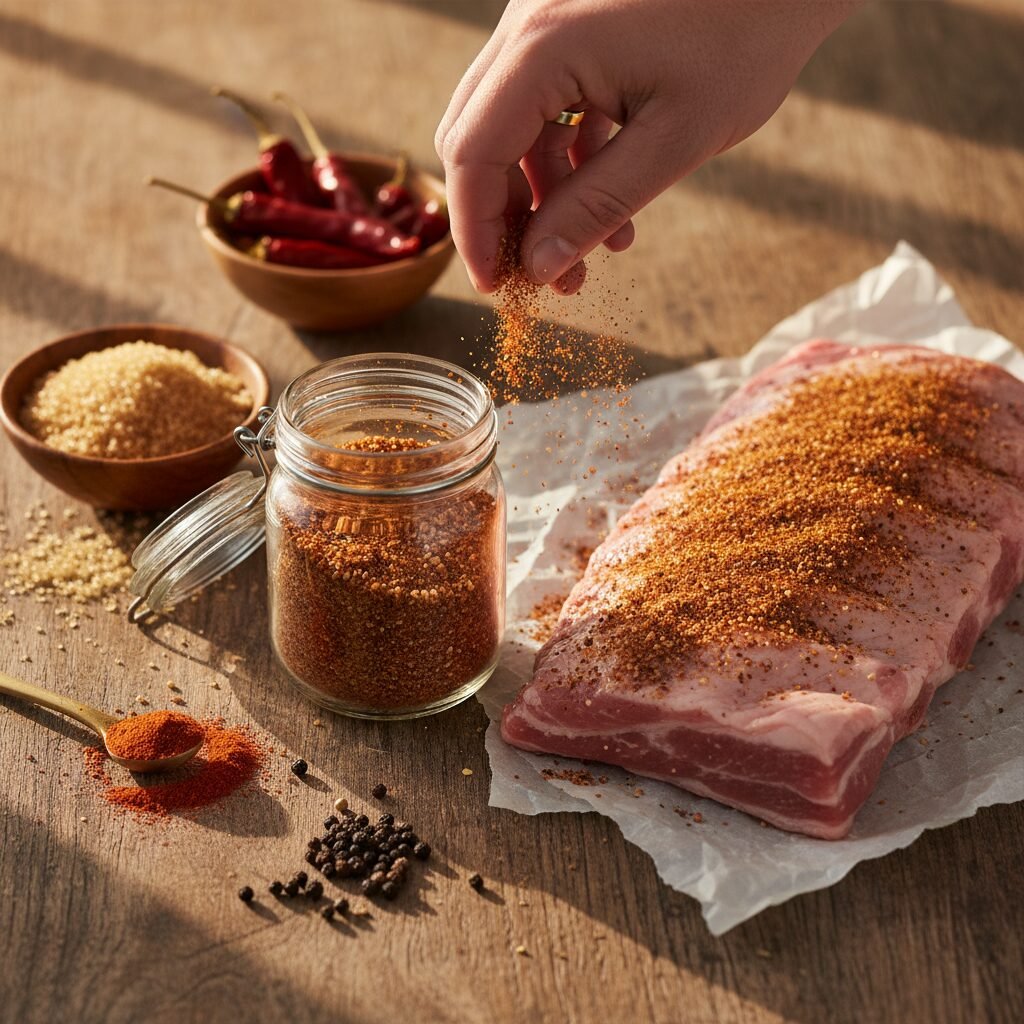
- Store or Use: Transfer the rub to an airtight mason jar or spice shaker if you are saving it. If you are using it immediately, generously coat your ribs.
- Application (Bonus Step): For the best results, pat your ribs dry with a paper towel. Rub a thin layer of yellow mustard or olive oil over the meat (this acts as a binder). Then, sprinkle the rub heavily over the meat and pat it in gently. Do not rub back and forth, just pat!
Expert Cooking Tips
- ✓Don’t Skimp: You want to coat the ribs generously. We are talking a solid layer of seasoning. This is what creates the crust.
- ✓The Binder: I always use cheap yellow mustard as a binder. You won’t taste the mustard after it cooks, I promise! It just helps the rub stick to the meat.
- ✓Let it Sit: If you have time, apply the rub, wrap the ribs in plastic wrap, and let them sit in the fridge for 2 to 4 hours before cooking. This allows the salt to penetrate the meat.
- ✓Sugar Warning: Because this rub has a high sugar content, be careful with direct high heat (like an open flame) for long periods, as sugar burns at 350°F. Cook low and slow!
- ✓Smoked Paprika is Key: I cannot stress this enough—regular paprika just adds color, but smoked paprika adds that campfire flavor. It makes a huge difference.
Substitutions and Variations
We are all busy moms here, and sometimes you just don’t have everything in the cupboard. Here are some swaps you can make:
- Brown Sugar: You can use golden monk fruit sweetener for a low-carb/Keto version, or Turbinado sugar for a crunchier texture.
- Kosher Salt: If you only have fine table salt, cut the amount in half. Table salt is much saltier by volume!
- Dry Mustard: If you don’t have this, you can omit it, or add a pinch of turmeric for color.
- Smoked Paprika: If you absolutely can’t find it, use regular paprika and add 1/2 teaspoon of liquid smoke to your binder (mustard/oil) before applying the rub.
Common Mistakes to Avoid
The biggest mistake people make is cross-contamination. Never dip your hands that touched raw meat back into your main jar of spice rub. Always pour the amount you need into a small separate bowl before you start seasoning the meat. Anything left in that small bowl after you touch the meat must be thrown away!
Another mistake is rubbing too hard. It is called a ‘rub,’ but you really want to pat the spices onto the meat. Rubbing vigorously can actually clump the spices and tear the meat fibers.
Serving Suggestions
This rub is obviously the star of the show for pork ribs (baby back or St. Louis style), but don’t stop there! It is incredibly versatile.
- Pulled Pork: Rub a whole pork shoulder (butt) with this before slow cooking.
- Chicken Thighs: It is delicious on grilled chicken legs or thighs.
- Roasted Veggies: Toss sweet potatoes or corn on the cob in a little oil and this rub before roasting.
- Popcorn: Yes, really! Sprinkle a little over buttered popcorn for a sweet and savory snack.
Storage and Reheating Tips
This recipe makes about 1 cup of rub. Store it in an airtight glass jar (mason jars are perfect and look cute in the pantry!) in a cool, dark place. It will stay fresh for up to 6 months. However, over time, the brown sugar might harden. If that happens, just throw a slice of white bread or a marshmallow into the jar for a day to soften it back up.
Nutrition Facts (Estimated)
| Serving Size | 2 Tablespoons |
| Calories | 45 |
| Fat | 0.5g |
| Saturated Fat | 0g |
| Unsaturated Fat | 0g |
| Trans Fat | 0g |
| Cholesterol | 0mg |
| Sodium | 2300mg |
| Carbohydrates | 11g |
| Fiber | 1g |
| Sugar | 9g |
| Protein | 0.5g |
Frequently Asked Questions
Is this rub spicy?
It has a very mild kick from the cayenne, but it is definitely family-friendly. If you are sensitive to spice, simply omit the cayenne pepper entirely. If you like it hot, double the cayenne!
Can I use this on beef ribs?
Absolutely! While traditional Texas beef ribs usually just use salt and pepper, this rub adds a wonderful complexity that works great on beef too.
How much rub do I need for one rack of ribs?
I recommend using about 1/4 cup to 1/3 cup of rub per rack of ribs. You want a nice, thick coating on both sides.
Should I put sauce on top?
That is up to you! This rub is flavorful enough to eat ‘dry,’ but if you love sauce, brush your favorite BBQ sauce on during the last 30 minutes of cooking.
Is this gluten-free?
Yes, all the individual spices listed are naturally gluten-free. Just double-check your specific spice bottles to ensure they weren’t processed in a facility with wheat.
Why is my rub clumping in the jar?
Brown sugar contains moisture which can cause clumping. Store your jar in a dry place, and you can add a food-safe silica packet or a few grains of uncooked rice to absorb excess moisture.
Can I use fresh garlic instead of powder?
I don’t recommend it for a dry rub. Fresh garlic has water content that can make the rub pasty and it burns very quickly at high temperatures, turning bitter.
What is the ‘membrane’ on ribs?
It is a thin, silver skin on the bone side of the ribs. It becomes tough when cooked. I recommend peeling it off with a paper towel before applying this rub so the flavor penetrates the meat from both sides.
Conclusion
I hope you give this Sweet & Smoky Dry Rub a try at your next cookout! It truly is one of those simple recipes that makes a massive difference in the final result. There is nothing quite like the pride of serving ribs that taste better than a restaurant, knowing you made the flavor profile yourself from scratch.
If you make this, please snap a photo and tag me on Instagram or Pinterest! I love seeing your BBQ creations. Happy grilling, y’all!