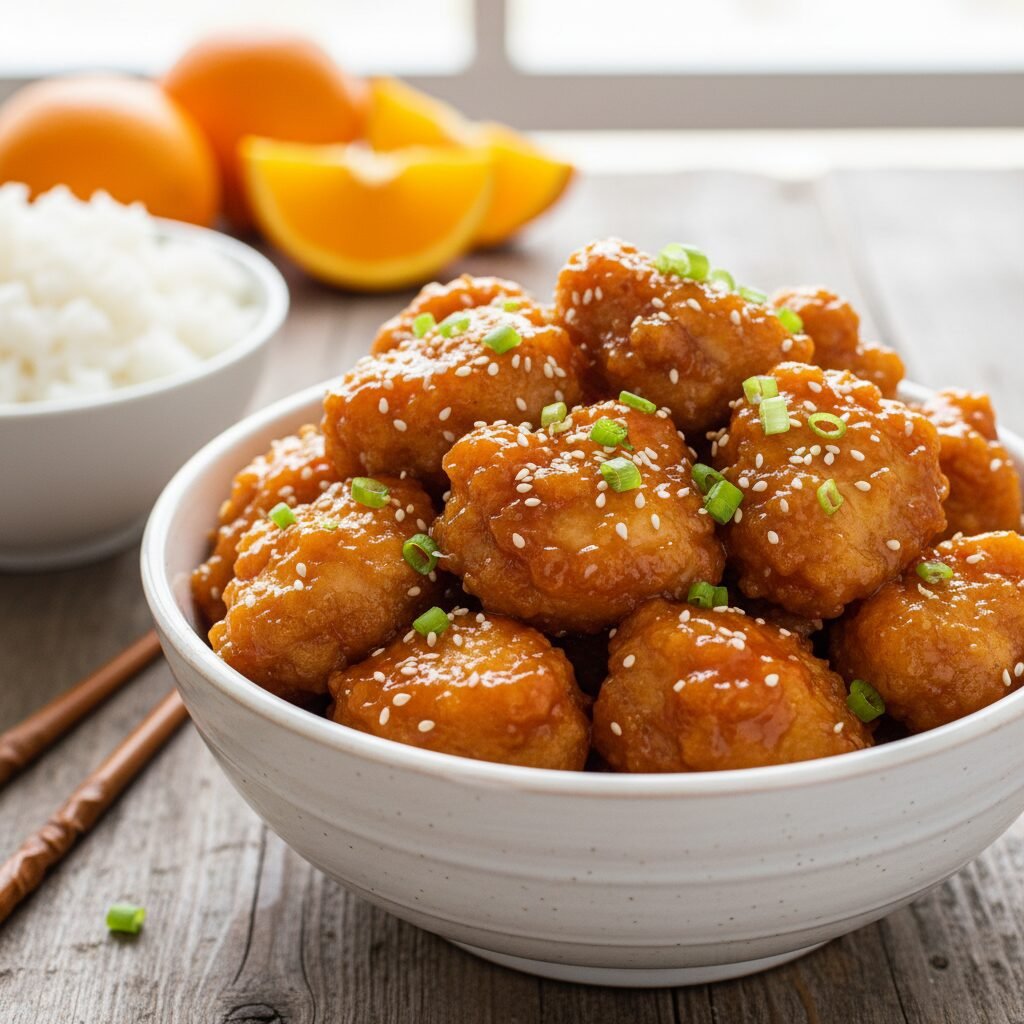
Air Fryer Orange Chicken
Craving that sticky, sweet, and savory goodness from your favorite takeout spot but want to keep it healthy? This Air Fryer Orange Chicken is a total game-changer! It is crispy, coated in a homemade zesty orange sauce, and ready in under 30 minutes.
15 minutes
15 minutes
30 minutes
4 Servings
Dinner
Air Fryer
American-Chinese
Dairy Free
Hey friends! If you are anything like me, busy weeknights often lead to that tempting thought: “Should we just order takeout?” We have all been there! But let’s be honest, by the time the food arrives, it is often lukewarm, expensive, and loaded with ingredients we can’t even pronounce. That is exactly why I am absolutely obsessed with this Air Fryer Orange Chicken recipe!
This has become a staple in our house because it satisfies that craving for Panda Express without the grease, the guilt, or the sugar crash. By using the air fryer, we get that incredible crunch on the chicken—yes, it actually sounds crunchy when you toss it in the bowl!—with just a tiny fraction of the oil used in deep frying. Plus, the sauce? Oh my goodness, the sauce. It is made with fresh orange juice and zest, so it bursts with real citrus flavor, not that artificial stuff.
Whether you are meal prepping for the week or need a quick dinner that your picky toddlers and hungry teenagers will both agree on, this recipe is a lifesaver. Put down the takeout menu, grab your air fryer basket, and let’s make some magic happen in the kitchen!
History & Origins
While we often associate Orange Chicken with traditional Chinese cuisine, it is actually a distinctly American-Chinese invention! The dish is widely credited to Chef Andy Kao at Panda Express in Hawaii back in 1987. He developed it as a variation of General Tso’s chicken but with a sweeter, citrus-forward profile to appeal to American palates. Originally, the dish involves deep-frying battered dark meat chicken and tossing it in a thick, sugary, chili-infused orange glaze. Over the decades, it has become one of the most popular takeout dishes in North America. Our version today honors that flavor profile but modernizes the cooking method using air convection technology to mimic the texture of deep-frying, making this beloved classic accessible for everyday home cooking.
Why This Recipe Works
This recipe works because of the Maillard reaction and the unique properties of cornstarch. Unlike flour, which can get soggy, cornstarch creates a barrier that crisps up beautifully under the high-velocity hot air of the fryer. By cutting the chicken into uniform pieces, we ensure maximum surface area for that coating to adhere to. The sauce relies on a cornstarch slurry (a mix of cornstarch and water) which allows it to thicken almost instantly when it hits the heat, coating the crispy chicken without making it soggy immediately. The combination of fresh orange zest and juice provides natural acidity (citric acid) which balances the sweetness of the sugar and the saltiness of the soy sauce, creating a perfectly rounded ‘umami’ flavor profile.
Why You’ll Love This Recipe
- ✓Ready in under 30 minutes
- ✓Significantly less fat than takeout
- ✓Dairy-free and easily gluten-free
- ✓Kid-friendly sweet and sticky sauce
- ✓Uses fresh oranges for real citrus flavor
- ✓Crispy texture without deep frying
Equipment You’ll Need
- ✓Air Fryer (Basket style or Oven style)
- ✓Large Mixing Bowl
- ✓Whisk
- ✓Small Saucepan
- ✓Microplane or Zester
- ✓Tongs
- ✓Meat Thermometer
Ingredients
- ✓1.5 lbs Chicken Breast or Thighs (boneless, skinless, cut into 1-inch cubes)
- ✓2 large Eggs (beaten)
- ✓1/2 cup Cornstarch (for coating)
- ✓1 tsp Salt
- ✓1/2 tsp Black Pepper
- ✓1/2 tsp Garlic Powder
- ✓Oil Spray (Avocado or Olive oil)
- ✓For The Sauce:
- ✓1/2 cup Fresh Orange Juice (about 2 oranges)
- ✓1 tbsp Fresh Orange Zest
- ✓3 tbsp Soy Sauce (or Tamari for GF)
- ✓1 tbsp Rice Vinegar
- ✓1 tbsp Brown Sugar or Honey
- ✓1 tsp Fresh Ginger (grated)
- ✓2 cloves Garlic (minced)
- ✓1 tsp Sesame Oil
- ✓1 tbsp Cornstarch + 1 tbsp Water (mixed for slurry)
- ✓Optional: Red Chili Flakes for heat
- ✓Garnish: Green Onions and Sesame Seeds
Instructions
- Step 1: Prep the Chicken. Pat your chicken pieces dry with a paper towel. This is crucial for crispiness! Season the chicken cubes with salt, pepper, and garlic powder.
- Step 2: Set up Dredging Station. Place the beaten eggs in one bowl. In a separate bowl or a large Ziploc bag, place the cornstarch.
- Step 3: Coat the Chicken. Dip the chicken pieces into the egg wash, shake off excess, and then toss them in the cornstarch until fully coated. Mom Tip: Do this in batches so they don’t stick together.
- Step 4: Air Fry. Preheat your air fryer to 400°F (200°C) for 3 minutes. Place the chicken in the basket in a single layer (do not overcrowd!). Spray the chicken generously with oil spray to cover any white flour spots. Cook for 10-12 minutes, shaking the basket halfway through and spraying any dry spots again.
- Step 5: Make the Sauce. While the chicken is frying, combine orange juice, zest, soy sauce, rice vinegar, sugar, ginger, garlic, and sesame oil in a small saucepan over medium heat. Bring to a simmer.
- Step 6: Thicken. Whisk in your cornstarch slurry (water + cornstarch) and stir constantly for 1-2 minutes until the sauce thickens into a glaze. Turn off the heat.
- Step 7: Combine. Once the chicken is golden and crispy (internal temp 165°F), transfer it to a large bowl. Pour the hot sauce over the chicken and toss immediately to coat.
- Step 8: Serve. Garnish with sesame seeds and chopped green onions. Serve hot over steamed rice or cauliflower rice!
Expert Cooking Tips
- ✓Don’t Overcrowd: Air fryers work by circulating hot air. If you stack the chicken, it will steam instead of crisp. Cook in two batches if needed!
- ✓Spray the Flour: Any dry white spots of cornstarch left on the chicken will taste powdery. Make sure to give a quick spray of oil halfway through cooking.
- ✓Fresh is Best: Use fresh orange juice and zest. Bottled juice often has too much added sugar and lacks that zingy citrus aroma.
- ✓Thighs vs. Breast: Chicken thighs are juicier and more forgiving if you accidentally overcook them, but breasts are leaner. Both work great!
Substitutions and Variations
If you are gluten-free, simply swap the soy sauce for Tamari or Coconut Aminos (the cornstarch is naturally gluten-free). For a vegan version, you can use extra firm tofu pressed and cubed instead of chicken. If you don’t have rice vinegar, apple cider vinegar is a great alternative. Want to cut the sugar? You can use maple syrup or even a keto-friendly sweetener like monk fruit, though the sauce might be slightly thinner.
Common Mistakes to Avoid
The biggest mistake is overcrowding the basket. I know it is tempting to dump it all in at once to save time, but you will end up with soggy, pale chicken. Another common error is burning the garlic in the sauce; make sure to whisk constantly once the sauce is on the heat. Lastly, don’t toss the chicken in the sauce until you are ready to eat! If it sits in the sauce for 30 minutes, it will lose that lovely crunch.
Serving Suggestions
This dish pairs perfectly with fluffy jasmine rice or brown rice to soak up the extra sauce. For a low-carb option, try cauliflower rice or zucchini noodles. I always serve this with a side of steamed broccoli or stir-fried snap peas to add some green to the plate. A sprinkle of toasted sesame seeds and sliced green onions on top makes it look restaurant-quality!
Storage and Reheating Tips
Store leftovers in an airtight container in the refrigerator for up to 3 days. To reheat: Do NOT use the microwave if you want it crispy! Place the chicken back in the air fryer at 350°F for 3-4 minutes until warmed through. The sauce might caramelize a bit more, making it extra sticky and delicious.
Nutrition Facts (Estimated)
| Serving Size | 1 cup |
| Calories | 320 kcal |
| Fat | 8g |
| Saturated Fat | 1.5g |
| Unsaturated Fat | 6g |
| Trans Fat | 0g |
| Cholesterol | 85mg |
| Sodium | 650mg |
| Carbohydrates | 28g |
| Fiber | 1g |
| Sugar | 14g |
| Protein | 32g |
Frequently Asked Questions
Can I use frozen chicken?
It is best to thaw the chicken completely before cutting and coating. Using frozen chicken will release too much water and make the cornstarch coating slide off.
Why is my coating powdery?
This happens if the cornstarch didn’t get enough oil or moisture. Make sure to spray the chicken generously with cooking spray before starting the air fryer and again when you shake the basket.
Is this spicy?
Not at all! The base recipe is sweet and tangy. The heat comes entirely from the optional red pepper flakes, so if you skip those, it is completely mild and kid-friendly.
Can I meal prep this?
Yes! You can cook the chicken and sauce separately. Store them in separate containers and toss them together just before heating, or store together and accept a softer texture (still delicious!).
Do I need parchment paper?
You don’t need it, but perforated parchment paper can help with cleanup. Just make sure not to put the paper in during preheating without food on it, or it can fly up into the heating element.
Can I double the sauce?
Absolutely! If you love extra sauce for your rice, simply double all the sauce ingredients. The cooking time for the sauce remains roughly the same.
What if I don’t have an air fryer?
You can bake the coated chicken on a wire rack over a baking sheet at 425°F for about 15-20 minutes, flipping halfway, until crispy.
Can I use flour instead of cornstarch?
You can, but cornstarch yields a much crispier, lighter coating that mimics deep frying better than all-purpose flour.
Conclusion
I really hope you give this Better Than Takeout Air Fryer Orange Chicken a try! It has truly saved our dinner routine on so many hectic nights. There is something so satisfying about serving a meal that tastes like a guilty pleasure but is actually full of wholesome ingredients. If you make this, please snap a photo and tag me on Instagram or leave a comment below—I love seeing your creations! Don’t forget to pin this recipe to your ‘Easy Weeknight Dinners’ board so you can find it later. Happy cooking!