Baked Parmesan Crusted Chicken
Say goodbye to dry, boring poultry forever! This 5-ingredient miracle dinner features a secret creamy garlic-parmesan coating that locks in juices and creates the most irresistible golden crust. It is the ultimate weeknight savior for busy moms.
10 minutes
20 minutes
30 minutes
4 Servings
Dinner
Baking
American
Low Carb
Hey there, beautiful mamas and busy home cooks! If there is one struggle we all share, it is the eternal quest for a chicken breast recipe that doesn’t taste like cardboard. You know what I’m talking about—that moment when you pull a baking sheet out of the oven, hopeful and hungry, only to find the meat is dry, rubbery, and totally uninspiring. Well, grab your aprons because today we are breaking up with dry chicken for good!
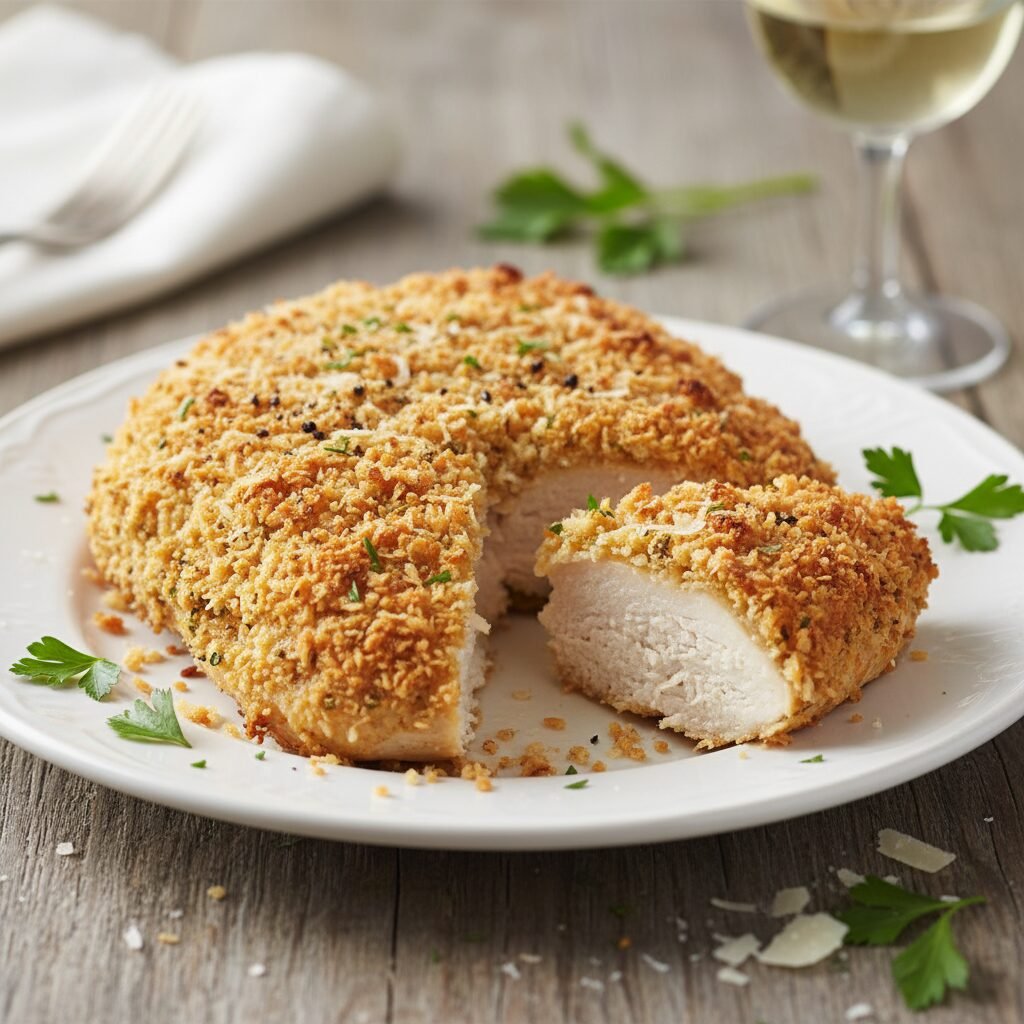
This Baked Parmesan Crusted Chicken is, without a doubt, the most popular recipe in my house. It is the kind of meal that makes my kids actually sit down at the table without being asked twice. The magic lies in the topping. Instead of a traditional three-step dredging station (flour, egg, crumbs—who has time for that mess on a Tuesday?), we use a rich, creamy mixture of mayonnaise, parmesan cheese, and seasonings spread right on top. I know, I know—mayonnaise on chicken? Trust me on this one!
When you bake it, the mayo melts down to baste the meat, keeping it incredibly tender, while the cheese and breadcrumbs crisp up into a golden, savory crust that is honestly addictive. It is fast, it is foolproof, and it feels fancy enough for Sunday dinner but easy enough for a chaotic Wednesday night. Let’s get cooking!
History & Origins
While breaded chicken cutlets have deep roots in European cuisine—think Austrian Wiener Schnitzel or Italian Chicken Milanese—this specific style of “Parmesan Crusted Chicken” is a distinctly American evolution of the mid-20th century casserole culture. It likely gained massive popularity through the “back of the box” recipes from major mayonnaise brands like Hellmann’s or Best Foods in the 1980s and 90s.
The concept was born out of convenience. Home cooks wanted the crunch of fried chicken without the mess of oil splatters or the time consumption of standing over a skillet. By utilizing mayonnaise as the fat source and binder, clever moms discovered they could skip the egg wash entirely. Over the last decade, with the rise of Pinterest and low-carb diets (where the breadcrumbs are often swapped for pork rinds or almond flour), this recipe has seen a massive resurgence, solidifying its place as a modern family classic.
Why This Recipe Works
There is actually some pretty cool culinary science happening in this simple dish! The primary reason this recipe works so well is the mayonnaise. Mayonnaise is an emulsion of oil, egg yolk, and acid (vinegar or lemon juice). When you coat the chicken in this mixture, the proteins in the egg set to form a crust, while the oil renders out to baste the chicken continuously as it bakes. This creates a moisture barrier that prevents the lean chicken breast fibers from drying out in the oven’s dry heat.
Secondly, we have the Parmesan and Panko combination. Parmesan cheese has a high glutamate content (umami) and creates a savory depth, while Panko breadcrumbs (which are lighter and airier than traditional breadcrumbs) absorb the melting fats from the cheese and mayo to fry in the oven. This creates that desirable Maillard reaction—browning and crisping—without needing a deep fryer.
Why You’ll Love This Recipe
- ✓Ready in under 30 minutes from fridge to table.
- ✓Uses only pantry staple ingredients.
- ✓The mayo-coating technique guarantees zero dry meat.
- ✓Kid-friendly and picky-eater approved.
- ✓Easily adaptable for Keto or Gluten-Free diets.
- ✓Minimal cleanup—just one bowl and a baking dish.
Equipment You’ll Need
- ✓Large baking dish (9×13 inch) or baking sheet
- ✓Small mixing bowl
- ✓Whisk or fork
- ✓Meat mallet (optional but recommended)
- ✓Parchment paper or silicone baking mat
Ingredients
- ✓4 boneless, skinless chicken breasts (about 1.5 lbs total)
- ✓1/2 cup mayonnaise (full fat works best)
- ✓1/2 cup freshly grated Parmesan cheese (plus extra for garnish)
- ✓1/2 cup Panko breadcrumbs (or regular breadcrumbs)
- ✓1 teaspoon garlic powder
- ✓1 teaspoon Italian seasoning (or dried oregano/basil mix)
- ✓1/2 teaspoon salt
- ✓1/2 teaspoon black pepper
- ✓Fresh parsley, chopped (for garnish)
Instructions
- Preheat and Prep: Preheat your oven to 400°F (200°C). Lightly grease a 9×13 inch baking dish with cooking spray or line a baking sheet with parchment paper for easy cleanup.
- Flatten the Chicken: If your chicken breasts are very thick or uneven, place them between two sheets of plastic wrap and gently pound them with a meat mallet until they are even thickness (about 3/4 inch). This ensures they cook at the same rate.
- Season the Meat: Pat the chicken breasts dry with paper towels. This is crucial for the topping to stick! Sprinkle both sides of the chicken lightly with salt and pepper, then arrange them in your prepared baking dish.
- Make the Magic Mixture: In a small bowl, combine the mayonnaise, grated Parmesan cheese, garlic powder, and Italian seasoning. Stir well to combine.
- Top the Chicken: Spoon the mayonnaise mixture evenly over the top of each chicken breast. Use the back of the spoon to spread it out, covering the surface of the meat completely.
- Add the Crunch: Sprinkle the Panko breadcrumbs generously over the mayonnaise layer on each breast. Gently press the crumbs down so they adhere to the creamy mixture.
- Bake: Place the dish in the preheated oven and bake for 15-20 minutes. The exact time depends on the thickness of your chicken. You want the internal temperature to reach 165°F (74°C).
- Broil for Gold: For that extra crispy finish, turn the oven to BROIL for the last 1-2 minutes. Watch it like a hawk! The breadcrumbs can go from golden brown to burnt in seconds. Remove when bubbly and golden.
- Rest and Serve: Let the chicken rest for 5 minutes before serving (this keeps the juices inside). Garnish with fresh chopped parsley and extra parmesan if desired.
Expert Cooking Tips
- ✓Pat it Dry: I cannot stress this enough—always pat your chicken dry with paper towels before seasoning. If the chicken is wet, the chicken steams instead of bakes, and the topping might slide off.
- ✓Don’t Skip the Rest: Letting the meat rest for 5 minutes allows the juices to redistribute. If you cut into it immediately, all that moisture runs out onto the plate.
- ✓Cheese Matters: While the green shaker can of parmesan works in a pinch, freshly grated parmesan melts better and offers a much nuttier, superior flavor.
- ✓Mayo Choice: Use real mayonnaise (like Hellmann’s or Duke’s). Miracle Whip has a sweetness that changes the flavor profile significantly and doesn’t pair as well with the garlic.
- ✓Uniform Size: Try to buy chicken breasts that are similar in size so they finish cooking at the same time. If one is huge, cut it in half horizontally to create two cutlets.
Substitutions and Variations
This recipe is incredibly forgiving and easy to adapt to your pantry or dietary needs!
- No Mayonnaise? You can substitute full-fat Greek yogurt or sour cream. The flavor will be slightly tangier, but it still works as a great binder.
- Gluten-Free: Swap the Panko breadcrumbs for gluten-free breadcrumbs or crushed gluten-free crackers.
- Keto / Low Carb: Omit the breadcrumbs entirely and just use extra Parmesan cheese mixed with almond flour or crushed pork rinds for the topping.
- Different Cheese: Asiago or Pecorino Romano are excellent substitutes for Parmesan. You can also mix in a little shredded mozzarella for a stretchier topping.
Common Mistakes to Avoid
The biggest mistake people make is overcooking the chicken. Chicken breast is lean, and once it goes past 165°F, it dries out rapidly. Invest in a cheap instant-read meat thermometer—it is a game changer! Another common pitfall is putting the topping on too thick. If you pile the mayo mixture an inch high, it won’t cook through properly and might end up greasy. A nice even layer is all you need.
Serving Suggestions
This chicken is versatile enough to go with almost anything! For a classic comfort meal, serve it alongside creamy mashed potatoes and roasted green beans. If you want to keep it lighter, slice it up and top a big Caesar salad. My kids love it served with buttered noodles or garlic bread. It is also fantastic sliced up cold the next day for wraps or sandwiches!
Storage and Reheating Tips
To Store: Place any leftovers in an airtight container in the refrigerator for up to 3 days.
To Reheat: Avoid the microwave if you want to keep the crust crispy! Reheat in the oven at 350°F for about 10 minutes, or pop it in the air fryer for 3-4 minutes at 350°F. If you must use the microwave, it will still taste delicious, but the breadcrumbs will be soft.
To Freeze: I do not recommend freezing the cooked chicken as the mayo topping can separate and get weird when thawed. However, you can freeze the raw chicken breasts separately and make the topping fresh when you are ready to cook.
Nutrition Facts (Estimated)
| Serving Size | 1 chicken breast |
| Calories | 420 |
| Fat | 24g |
| Saturated Fat | 6g |
| Unsaturated Fat | 16g |
| Trans Fat | 0g |
| Cholesterol | 110mg |
| Sodium | 680mg |
| Carbohydrates | 12g |
| Fiber | 1g |
| Sugar | 1g |
| Protein | 38g |
Frequently Asked Questions
Does this taste like mayonnaise?
Not at all! I promise. The mayonnaise cooks down and essentially disappears, leaving behind a rich, moist texture. It tastes like a creamy, savory garlic sauce. Even people who hate mayo love this chicken.
Can I use chicken thighs instead?
Absolutely! Boneless, skinless chicken thighs work beautifully. They are naturally juicier and more forgiving if you accidentally overcook them. You may need to add 5 minutes to the cooking time.
Why is my topping soggy?
This usually happens if the chicken wasn’t patted dry before adding the topping, or if the chicken released a lot of water during baking. Make sure to use high-heat (400°F) to evaporate moisture, and don’t skip the broiling step at the end!
Can I prep this ahead of time?
Yes! You can spread the mayo mixture on the chicken earlier in the day and keep it covered in the fridge. Just add the Panko breadcrumbs right before you put it in the oven so they stay crisp.
How do I know when the chicken is done?
The safest and best way is using a meat thermometer inserted into the thickest part of the breast. It should read 165°F (74°C). The juices should run clear, not pink.
Can I make this in an Air Fryer?
Yes! Preheat air fryer to 375°F. Cook for about 12-15 minutes depending on thickness. It gets incredibly crispy in the air fryer!
Is this recipe spicy?
No, it is very mild and kid-friendly. If you want a kick, add a pinch of red pepper flakes or a dash of cayenne pepper to the mayo mixture.
Can I use plain yogurt instead of mayo?
You can, but stick to full-fat Greek yogurt for the best texture. Non-fat yogurt can curdle or become watery in the high heat of the oven.
Conclusion
And there you have it, friends! The easiest, cheesiest, most succulent chicken recipe you will ever make. I hope this Baked Parmesan Crusted Chicken becomes a regular in your meal rotation just like it is in mine. It is truly one of those “back pocket” recipes that saves the day when you are tired and hungry.
If you try this recipe, please snap a picture and tag me on Instagram or leave a comment below! I love seeing your creations and hearing how your family liked it. Happy cooking, mamas!