Chicken And Gravy
There is nothing quite like a plate of tender chicken swimming in rich, homemade gravy to wash away a long day. This recipe is pure comfort in a skillet and comes together in just about 30 minutes, making it a weeknight savior!
10 mins
20 mins
30 mins
4 Servings
Dinner
Stovetop
American
Omnivore
Hey friends! Welcome back to my kitchen. Today, we are talking about serious comfort food. You know, the kind of meal that feels like a warm hug on a cold day? I am talking about Old Fashioned Chicken and Gravy. If you grew up in a house anything like mine, the smell of savory gravy bubbling on the stove was basically the signal that everything was going to be alright.
Life gets so busy with the kiddos, school runs, and the endless pile of laundry (does it ever actually end?), that sometimes we just need a dinner that is simple, hearty, and guaranteed to be eaten without a single complaint. This chicken and gravy recipe is exactly that. It is not fancy, it does not require ingredients you can’t pronounce, and it is ready in about 30 minutes.
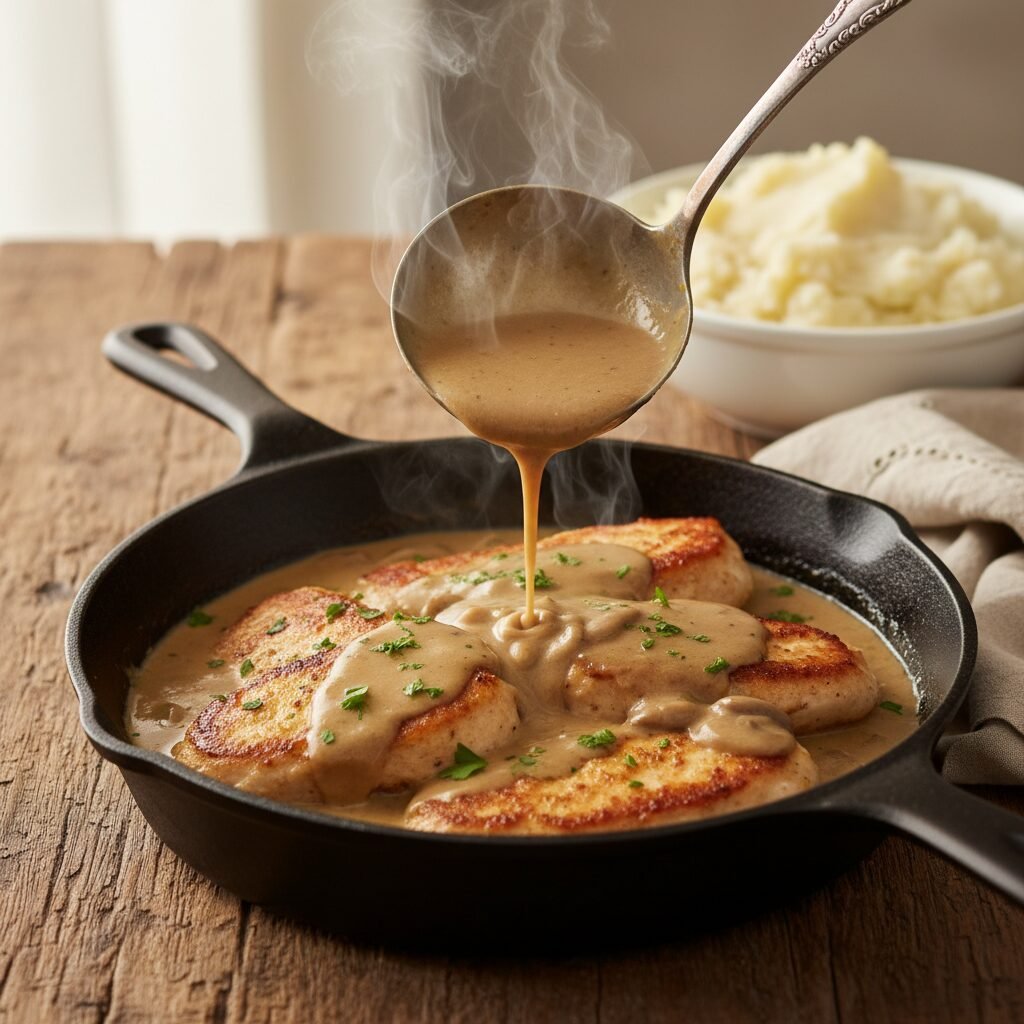
We are taking tender, pan-seared chicken breasts and smothering them in a scratch-made gravy that is so good you will want to drink it with a straw (I won’t judge!). Serve this over a fluffy mound of mashed potatoes or white rice, and you have got a dinner that will have your family scraping their plates clean. Let’s get cooking!
History & Origins
Chicken and gravy is a dish deeply rooted in American culinary history, particularly within Southern and rural cooking traditions. It is a close cousin to “Smothered Chicken” and “Chicken Fricassee,” techniques that date back centuries. Historically, these dishes were born out of practicality. Gravy was a way to stretch a meal, adding calories and flavor to feed a large family when meat might have been scarce or expensive.
The concept of making a roux—cooking flour and fat together to thicken a liquid—is a French technique that made its way into American kitchens and became the backbone of Southern cooking. Over generations, this dish evolved from a Sunday supper staple to a diner classic, and now, it is a weeknight hero for busy moms everywhere. It represents the best of farmhouse cooking: using simple pantry staples to create something rich and filling.
Why This Recipe Works
This recipe works so beautifully because it builds flavor in layers using a single pan. By searing the chicken first, we create what chefs call fond—those golden-brown caramelized bits stuck to the bottom of the skillet. That is pure flavor gold! When we add the butter and flour to make the gravy, we scrape up those bits, infusing the sauce with a deep, roasted chicken essence that you just cannot get from a jar.
Technically speaking, we are creating an emulsion. The flour and butter form a roux, which stabilizes the chicken broth and cream, preventing the sauce from breaking and giving it that luxurious, velvety texture. The addition of heavy cream (or half-and-half) adds richness that balances the saltiness of the broth, while the poultry seasoning ties the meat and the sauce together with herbaceous notes of sage and thyme.
Why You’ll Love This Recipe
- ✓Ready in under 30 minutes
- ✓Uses simple pantry staples
- ✓Kid-friendly and picky-eater approved
- ✓One-skillet meal (less cleanup!)
- ✓Budget-friendly protein option
- ✓Freezes and reheats beautifully
Equipment You’ll Need
- ✓Large Skillet (Cast Iron or Stainless Steel preferred)
- ✓Whisk
- ✓Tongs
- ✓Measuring Cups and Spoons
- ✓Meat Mallet (for pounding chicken)
Ingredients
- ✓2 large boneless, skinless chicken breasts (sliced horizontally into 4 cutlets)
- ✓1/2 cup All-Purpose flour (divided: 1/4 for dredging, 1/4 for gravy)
- ✓1 teaspoon garlic powder
- ✓1 teaspoon onion powder
- ✓1/2 teaspoon paprika
- ✓Salt and black pepper to taste
- ✓2 tablespoons olive oil
- ✓3 tablespoons unsalted butter
- ✓2 cups chicken broth (low sodium is best)
- ✓1/2 cup heavy cream (or half-and-half)
- ✓1 teaspoon poultry seasoning (or dried thyme)
- ✓Fresh parsley for garnish
Instructions
- Step 1: Prep the Chicken. Slice your chicken breasts horizontally to create 4 thin cutlets. If they are uneven, place them between plastic wrap and pound them gently with a meat mallet until they are uniform thickness. This ensures they cook evenly and quickly.
- Step 2: Season and Dredge. In a shallow dish, mix 1/4 cup of the flour with the garlic powder, onion powder, paprika, salt, and pepper. Dredge each chicken cutlet in the flour mixture, shaking off any excess. We want a light coating, not a heavy batter.
- Step 3: Sear the Chicken. Heat the olive oil in a large skillet over medium-high heat. Once the oil is shimmering, add the chicken. Cook for about 4-5 minutes per side until golden brown and cooked through (internal temp should reach 165°F). Remove the chicken to a plate and set aside.
- Step 4: Make the Roux. Lower the heat to medium. In the same pan (do not clean it!), add the butter. Once melted, sprinkle in the remaining 1/4 cup of flour. Whisk constantly for about 1 minute to cook out the raw flour taste. It should look like a golden paste.
- Step 5: Create the Gravy. Slowly pour in the chicken broth while whisking vigorously to prevent lumps. Make sure to scrape the bottom of the pan to release those brown bits! Stir in the poultry seasoning. Let it simmer for 2-3 minutes until it starts to thicken.
- Step 6: Finish the Sauce. Stir in the heavy cream. Taste the gravy and add more salt and plenty of black pepper if needed. If it’s too thick, add a splash more broth.
- Step 7: Combine and Serve. Return the cooked chicken (and any juices on the plate) back into the skillet. Spoon the gravy over the chicken and let it warm through for 1 minute. Garnish with fresh parsley and serve hot!
Expert Cooking Tips
- ✓Don’t skip the pound: Pounding the chicken ensures it cooks evenly so you don’t end up with dry edges and a raw center.
- ✓Warm the broth: If you have time, microwave your broth for a minute before adding it. Adding hot liquid to a hot roux helps prevent lumps faster than cold liquid.
- ✓Whisk is key: Use a flat whisk if you have one; it helps get right into the corners of the pan to incorporate all the fond.
- ✓Taste as you go: The saltiness of chicken broth varies wildly. Always taste your gravy before adding the final pinch of salt.
Substitutions and Variations
If you are out of heavy cream, you can absolutely use half-and-half or even whole milk, though the gravy won’t be quite as rich. For a dairy-free version, use plant-based butter and an unsweetened oat milk or almond milk (just watch the flavor profile!). If you don’t have chicken breasts, boneless skinless chicken thighs work wonderfully and stay very juicy. For my gluten-free friends, simply swap the all-purpose flour for a high-quality 1:1 Gluten-Free flour blend for both the dredging and the gravy.
Common Mistakes to Avoid
The biggest mistake people make is burning the garlic or the roux. Keep your heat manageable! Another common issue is lumpy gravy. This usually happens if you dump all the liquid in at once without whisking. Pour slowly, whisk quickly! Finally, do not overcook the chicken during the first sear. Remember, it goes back into the hot gravy at the end, so pull it off the heat as soon as it hits 165°F.
Serving Suggestions
This dish practically begs for mashed potatoes. I mean, is there a better vehicle for gravy? I don’t think so! However, it is also delicious served over white rice, egg noodles, or even a slice of thick, toasted sourdough bread (open-faced sandwich style!). For veggies, I love serving this with steamed green beans, roasted broccoli, or sweet glazed carrots to add some color to the plate.
Storage and Reheating Tips
Leftovers can be stored in an airtight container in the refrigerator for up to 3 days. To reheat, place the chicken and gravy in a skillet over low heat. You will likely need to add a splash of water or broth to the gravy, as it tends to thicken up into a gelatinous state when cold (that just means it’s good bone broth!). You can freeze this, but cream-based sauces can sometimes separate when thawed. If that happens, just whisk it vigorously while reheating.
Nutrition Facts (Estimated)
| Serving Size | 1 chicken breast with gravy |
| Calories | 480 |
| Fat | 28g |
| Saturated Fat | 14g |
| Unsaturated Fat | 12g |
| Trans Fat | 0g |
| Cholesterol | 145mg |
| Sodium | 850mg |
| Carbohydrates | 12g |
| Fiber | 1g |
| Sugar | 2g |
| Protein | 42g |
Frequently Asked Questions
Can I use frozen chicken breasts?
You should thaw them completely first. Cooking frozen chicken directly in the pan will release too much water, preventing a good sear, and the texture can become rubbery.
My gravy is too thin, how do I fix it?
Let it simmer for a few more minutes; evaporation will thicken it. If it’s still too thin, mix 1 teaspoon of cornstarch with 1 tablespoon of cold water (slurry) and stir it into the boiling gravy.
My gravy is too thick, what do I do?
This is an easy fix! Just whisk in more chicken broth or water, a tablespoon at a time, until you reach your desired consistency.
Can I make this in a slow cooker?
Yes, but the method changes. You won’t get the seared crust, but you can cook chicken in broth and seasonings on low for 6 hours, then shred it and thicken the juices with a cornstarch slurry and cream at the end.
What if I don’t have poultry seasoning?
No problem! You can make your own blend using dried thyme, dried sage, and a little rosemary. Or just stick to simple salt, pepper, and garlic.
Can I add mushrooms to this?
Oh, absolutely! Sliced mushrooms are a delicious addition. Sauté them in the butter before adding the flour for the roux.
Is this recipe spicy?
Not at all. The paprika adds color and a tiny bit of warmth, but no heat. If you want a kick, add a pinch of cayenne pepper.
Can I use pre-cooked rotisserie chicken?
Yes! Skip the searing step. Make the gravy as instructed (you might need a little extra butter since you won’t have pan drippings), then toss in the shredded rotisserie chicken to warm through.
Conclusion
I really hope this Old Fashioned Chicken and Gravy recipe finds its way to your dinner table soon. It is one of those meals that reminds us that cooking doesn’t have to be complicated to be absolutely delicious. It’s hearty, wholesome, and sure to put a smile on everyone’s face. If you make this, please tag me on Instagram or leave a comment below—I love seeing your creations! Now, go get those potatoes mashing!