Drop Dumplings Recipe
There is nothing quite like a steaming bowl of chicken soup topped with pillowy, soft dumplings to cure the rainy day blues. These drop dumplings are foolproof, fluffy clouds of joy that come together in minutes and will have your family begging for seconds!
10 minutes
15 minutes
25 minutes
8 servings
Dinner
Steaming/Boiling
American
Vegetarian
Hey there, lovely mamas! Let’s talk about pure, unadulterated comfort food. You know those days when the rain is tapping against the window, the house feels a little chilly, and you just need a big, warm hug in a bowl? That is exactly what these Old-Fashioned Fluffy Drop Dumplings are. If you grew up in the South or had a grandma who believed food was love, you probably have a core memory of a heavy Dutch oven bubbling away on the stove, filled with rich broth and these magical floating biscuits.
For years, I was actually intimidated by dumplings! I worried they would turn out heavy, leaden, or chewy—the dreaded ‘hockey pucks’ of the soup world. But let me tell you a secret: making light-as-air dumplings is actually incredibly easy. It comes down to just a few pantry staples and one golden rule that you absolutely cannot break (we will get to that in a minute!).
This recipe is my go-to weeknight savior. When I have a leftover rotisserie chicken carcass or just a pot of vegetable soup that needs a little ‘oomph’ to fill up my hungry teenagers, I whip up a batch of this dough. It takes less than 10 minutes to prep, and the result is a rustic, hearty, stick-to-your-ribs meal that feels fancy but costs pennies to make. So, grab your mixing bowl and let’s make some magic happen!
History & Origins
Drop dumplings are a culinary treasure with deep roots in American history, specifically born out of necessity and ingenuity. While dumplings in some form exist in almost every culture globally—from Italian gnocchi to Chinese wontons—the fluffy, biscuit-style drop dumpling is a quintessential part of American comfort cooking, particularly in the South and Midwest.
During the Great Depression and times of rationing, home cooks had to be incredibly resourceful. Meat was expensive and scarce, so families needed a way to stretch a thin soup or stew into a meal that could feed a large family. By mixing inexpensive flour, a little fat (often lard or reserved bacon grease back then), and milk or water, they created a dough that expanded significantly when cooked. This allowed a meager pot of chicken broth to transform into ‘Chicken and Dumplings,’ a substantial dinner that left bellies full.
Unlike rolled dumplings (often called ‘slicks’ or pastry dumplings), which are rolled out flat like noodles and are denser and chewier, drop dumplings rely heavily on chemical leaveners like baking powder. This innovation became popular in the mid-19th century with the commercial availability of baking powder, allowing for that signature puffy, cloud-like texture we crave today.
Why This Recipe Works
The science behind these perfect dumplings is all about steam and gluten management. Unlike bread dough where we want to knead to develop gluten for structure, dumplings require a gentle hand. We mix the dough just until the ingredients are combined to keep the gluten strands short and tender. If you overmix, the gluten becomes tough, resulting in rubbery dumplings.
The second key factor is the leavening agent. We use a generous amount of baking powder here. When the baking powder hits the liquid and heat, it releases carbon dioxide gas, creating tiny air pockets within the dough. Because we cook these in a covered pot, the steam gets trapped. This steam environment allows the dumplings to rise rapidly and sets the starch on the outside before the inside dries out, resulting in a texture that is moist and fluffy rather than dry and crumbly. The lid acts as a pressure cooker of sorts, forcing heat through the dumpling quickly.
Why You’ll Love This Recipe
- ✓Ready in under 25 minutes
- ✓Uses simple pantry staples
- ✓No rolling pin required
- ✓Creates a complete meal from simple broth
- ✓Kid-approved texture
- ✓Easily customizable with herbs
Equipment You’ll Need
- ✓Large mixing bowl
- ✓Measuring cups and spoons
- ✓Pastry blender or fork
- ✓Large Dutch oven or soup pot with a tight-fitting lid
- ✓Cookie scoop or two tablespoons
Ingredients
- ✓2 cups All-Purpose Flour (do not use bread flour)
- ✓1 tablespoon Baking Powder (ensure it is fresh!)
- ✓1 teaspoon Salt
- ✓1 teaspoon Sugar (optional, but helps browning and flavor balance)
- ✓4 tablespoons Cold Butter, cubed (unsalted is best)
- ✓1 cup Whole Milk (or buttermilk for tang)
- ✓2 tablespoons Fresh Parsley or Chives, chopped (optional)
- ✓Freshly cracked black pepper to taste
Instructions
- Prep the Dry Ingredients: In a large mixing bowl, whisk together the flour, baking powder, salt, sugar, and cracked black pepper. Whisking ensures the baking powder is evenly distributed so your dumplings rise uniformly.
- Cut in the Fat: Add the cold, cubed butter to the flour mixture. Use a pastry blender or two forks to cut the butter into the flour until the mixture looks like coarse crumbs. You want small pea-sized bits of butter remaining; these melt during cooking to create flaky pockets.
- Add Herbs (Optional): If you are using fresh parsley, dill, or chives, stir them into the flour mixture now.
- Mix the Dough: Pour in the cold milk. Using a wooden spoon or spatula, stir gently just until the dry ingredients are moistened. The dough should look shaggy and sticky. Do not overmix! It is okay if it looks a little rough.
- Simmer Your Soup: Ensure your stew or soup base is at a gentle simmer on the stove. It should be bubbling but not boiling violently, as a rolling boil can break the dumplings apart.
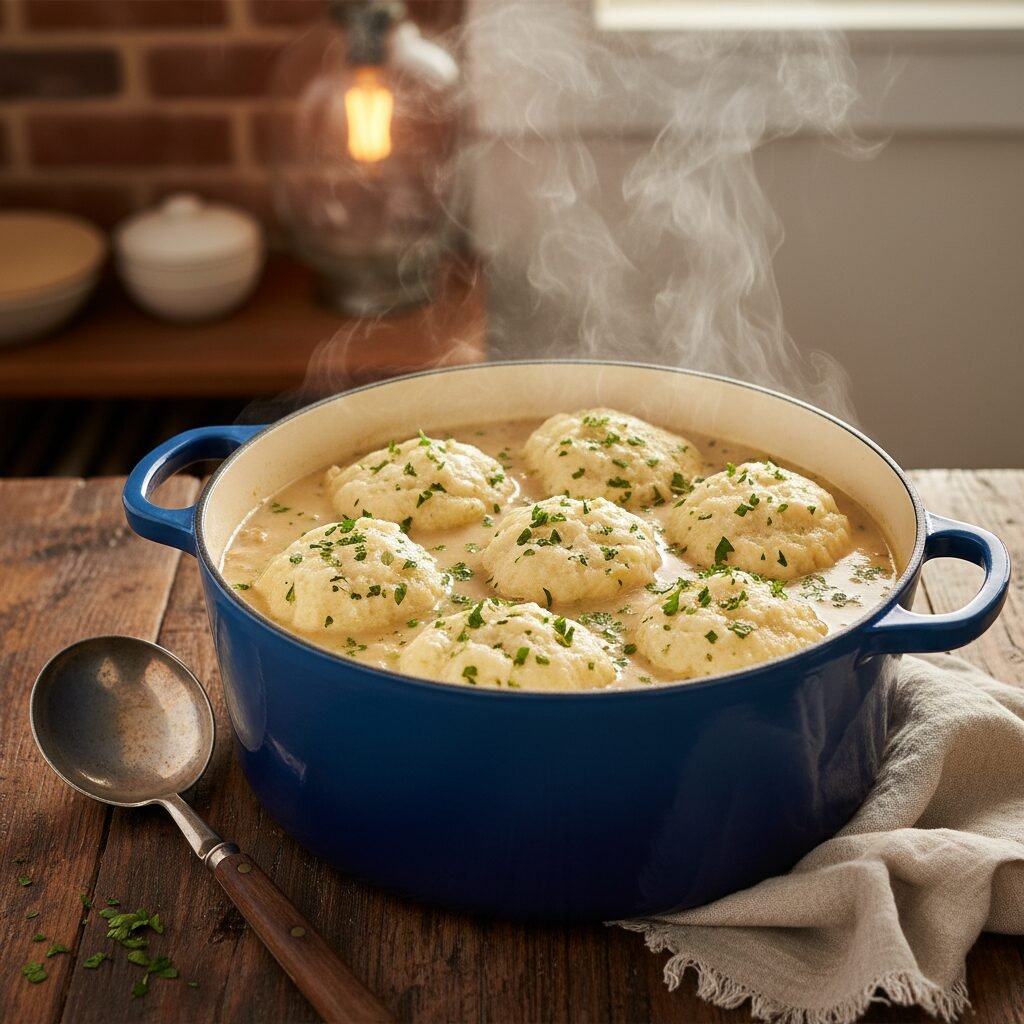
- Drop the Dumplings: Using a cookie scoop or two tablespoons, scoop golf-ball-sized portions of dough and drop them directly onto the simmering liquid. Try to space them out slightly, though they will expand and touch (which is fine).
- The Golden Rule – Cover and Wait: Immediately place a tight-fitting lid on the pot. Reduce the heat to low-medium to maintain a simmer. Set a timer for 15 minutes and DO NOT LIFT THE LID.
- Serve: After 15 minutes, remove the lid. The dumplings should be puffed up and cooked through. To test, you can take one out and cut it open; it should look like a fluffy biscuit inside, not doughy. Serve immediately with a ladle full of broth!
Expert Cooking Tips
- ✓Fresh Baking Powder is Key: If your baking powder has been sitting in the pantry for 2 years, throw it out! Old baking powder won’t give you the lift you need, and you’ll end up with dense balls of dough.
- ✓Don’t Peek! I cannot stress this enough. Lifting the lid releases the steam that is cooking the top of the dumplings. If you lose the steam, they will turn out heavy and soggy.
- ✓The Liquid Matters: Make sure there is enough liquid in your pot. The dumplings need to float on top, not sit on the bottom where they might burn. Add an extra cup of chicken broth if your stew looks too thick before adding the dough.
- ✓Room for Growth: Remember that these will double or even triple in size. Don’t make the dough balls too big to start with, or they won’t cook through to the center.
Substitutions and Variations
Dairy-Free: You can absolutely swap the whole milk for unsweetened almond milk or oat milk. Use a plant-based butter stick or even solid coconut oil instead of dairy butter.
Buttermilk: For a tangier, more Southern-style dumpling, replace the regular milk with buttermilk. If you do this, add 1/4 teaspoon of baking soda to the dry ingredients to balance the acidity.
Gluten-Free: Use a high-quality 1:1 Gluten-Free Baking Flour blend that contains xanthan gum. The texture might be slightly different, but it still works well for comfort cravings.
Fat Options: If you don’t have butter, vegetable shortening or even reserved bacon grease works wonderfully and adds a savory depth.
Common Mistakes to Avoid
The most common mistake is overmixing the dough. Once the liquid hits the flour, you want to stir as little as possible—just until the flour disappears. If you beat it like a cake batter, the gluten develops too much, and you get chewy, tough dumplings.
Another frequent error is boiling the soup too hard. If the liquid is at a rolling boil, the agitation will disintegrate the dumplings before they have a chance to set. Keep it at a gentle, consistent simmer.
Lastly, crowding the pot can be an issue. If you make a double batch, cook them in two rounds or use a very wide pot. They need space to expand sideways and upwards.
Serving Suggestions
These dumplings are the classic partner for Creamy Chicken Soup, but don’t stop there! They are incredible atop a rich Beef and Guinness Stew, a vegetarian Mushroom and Potato Chowder, or even a simple Tomato Bisque. I love serving them with a side of bright, steamed green beans or a crisp garden salad with vinaigrette to cut through the richness of the dough and broth.
Storage and Reheating Tips
Refrigerator: Leftover dumplings can be stored in the soup in an airtight container for up to 3 days. Note that they will continue to absorb broth, so they might be softer the next day.
Reheating: Gently reheat on the stovetop over low heat. You may need to add a splash of water or broth to loosen the stew as the dumplings will have thickened it.
Freezing: I don’t recommend freezing cooked dumplings as the texture becomes mushy. However, you can freeze the raw dough balls on a baking sheet, then transfer to a bag. When ready to eat, drop them frozen into simmering soup and add 5-7 minutes to the cooking time.
Nutrition Facts (Estimated)
| Serving Size | 2 dumplings |
| Calories | 180 |
| Fat | 8g |
| Saturated Fat | 5g |
| Unsaturated Fat | 3g |
| Trans Fat | 0g |
| Cholesterol | 20mg |
| Sodium | 320mg |
| Carbohydrates | 24g |
| Fiber | 1g |
| Sugar | 1g |
| Protein | 4g |
Frequently Asked Questions
Why are my drop dumplings tough and chewy?
This is almost always due to overmixing the dough. Treat it like a delicate biscuit dough—mix only until combined. Also, ensure you didn’t let the liquid boil too vigorously.
Can I use self-rising flour?
Yes! If you use self-rising flour, omit the baking powder and salt from the recipe. Just add the fat and milk.
Why did my dumplings dissolve in the soup?
The soup was likely boiling too hard, breaking them apart, or you didn’t cover the pot immediately. The lid traps steam which sets the outside of the dumpling quickly.
Can I use water instead of milk?
You can, and this was common during the Depression era. However, milk adds richness, tenderness, and flavor. If using water, consider adding a little extra butter.
How do I know when they are done?
They should look puffed and dry on top. Insert a toothpick or cut one open; the center should look like fluffy bread, not wet batter.
Can I add cheese to the dough?
Absolutely! Stir in 1/2 cup of shredded sharp cheddar or parmesan with the dry ingredients for cheesy dumplings.
Do I have to use a Dutch oven?
No, any large pot works as long as it has a lid that fits tightly. If your lid has a steam vent, cover it with a piece of foil.
Can I make the dough ahead of time?
It is best to make the dough right before cooking because the baking powder activates once it hits the liquid milk. However, you can mix the dry ingredients days in advance.
Conclusion
There you have it, friends—the secret to the fluffiest, most comforting Drop Dumplings you will ever make. I hope this recipe brings a little extra warmth to your kitchen table tonight. It really is one of those simple pleasures that reminds us that homemade food doesn’t have to be complicated to be spectacular.
If you try this recipe, please leave a comment below and let me know how it turned out! Did you add herbs? Did you serve it with chicken or beef? I love hearing your variations. Happy cooking, mamas!