Beer Bread Recipe
Can you believe you are just three ingredients away from the most delicious, buttery loaf of homemade bread you’ve ever tasted? Forget the fear of yeast and rising times; this foolproof beer bread recipe is the ultimate dinner hack for busy families.
5 minutes
50 minutes
55 minutes
1 Loaf (12 Slices)
Side Dish
Baking
American
Vegetarian
Hey there, lovely mamas! Let’s have a real talk for a second. Is there anything more intimidating in the kitchen than the word yeast? I remember staring at those little packets in the grocery store aisle, terrified that I would kill the yeast, or the water would be too hot, or the dough wouldn’t rise, and I’d be left with a rock-hard brick instead of a fluffy loaf. If you have ever felt that ‘bread-xiety,’ I am here to tell you that your life is about to change forever.
Enter: Beer Bread. This recipe is my absolute go-to secret weapon. It is the ‘I forgot to buy rolls for dinner’ savior. It is the ‘I want to impress the in-laws without breaking a sweat’ masterpiece. We are talking about a bread that requires zero kneading, zero proofing time, and practically zero effort. You literally dump the ingredients into a bowl, stir it up (but not too much!), and pop it in the oven. That is it. The result is a golden, crunchy-crusted, soft-centered loaf that tastes like you spent hours slaving away in the kitchen.
There is something so incredibly comforting about the smell of fresh bread baking in the oven. It fills the whole house with this warm, yeasty (ironic, right?), buttery aroma that just screams ‘home.’ My kids absolutely go crazy for this. We serve it alongside chili on game days, with hearty vegetable soups on rainy afternoons, or honestly? Just sliced thick and slathered with honey butter for a breakfast that feels like a hug. So, grab your favorite mixing bowl and let’s get baking!
History & Origins
While we might think of beer bread as a modern pantry hack, the concept of using fermented beverages to rise bread actually dates back centuries. Historically, before commercial yeast was readily available in those neat little yellow packets, bakers relied on ‘barm’—the foam that forms on top of fermenting beer—to leaven their bread. This barm was rich in live yeast cultures, making it the perfect starter for loaves.
However, the specific ‘quick bread’ style of beer bread that we know and love today—using baking powder as the primary lifting agent alongside the carbonation of the beer—became much more popular in American households during the mid-20th century. It gained massive popularity because it bridged the gap between a savory dinner roll and a slightly sweet cake. It is a classic example of American ingenuity in the kitchen: taking simple, shelf-stable ingredients and turning them into something spectacular. It’s a descendant of the soda breads of Ireland and the damper breads of Australia, all sharing that common thread of needing a quick, reliable way to put bread on the table without the long wait.
Why This Recipe Works
Alright, science nerds (and curious cooks), let’s break down why this recipe works like magic. You might be wondering, ‘If there is no yeast, how does it rise?’ The secret lies in the combination of the self-rising flour and the carbonation in the beer.
Self-rising flour already contains baking powder and salt. When the baking powder gets wet, it starts a chemical reaction that creates bubbles. But we don’t stop there! The beer is carbonated, meaning it is packed with carbon dioxide bubbles. When you mix the beer into the flour, you are essentially injecting thousands of tiny air pockets into your batter right from the start. The heat of the oven then expands these bubbles, causing the bread to lift and become fluffy.
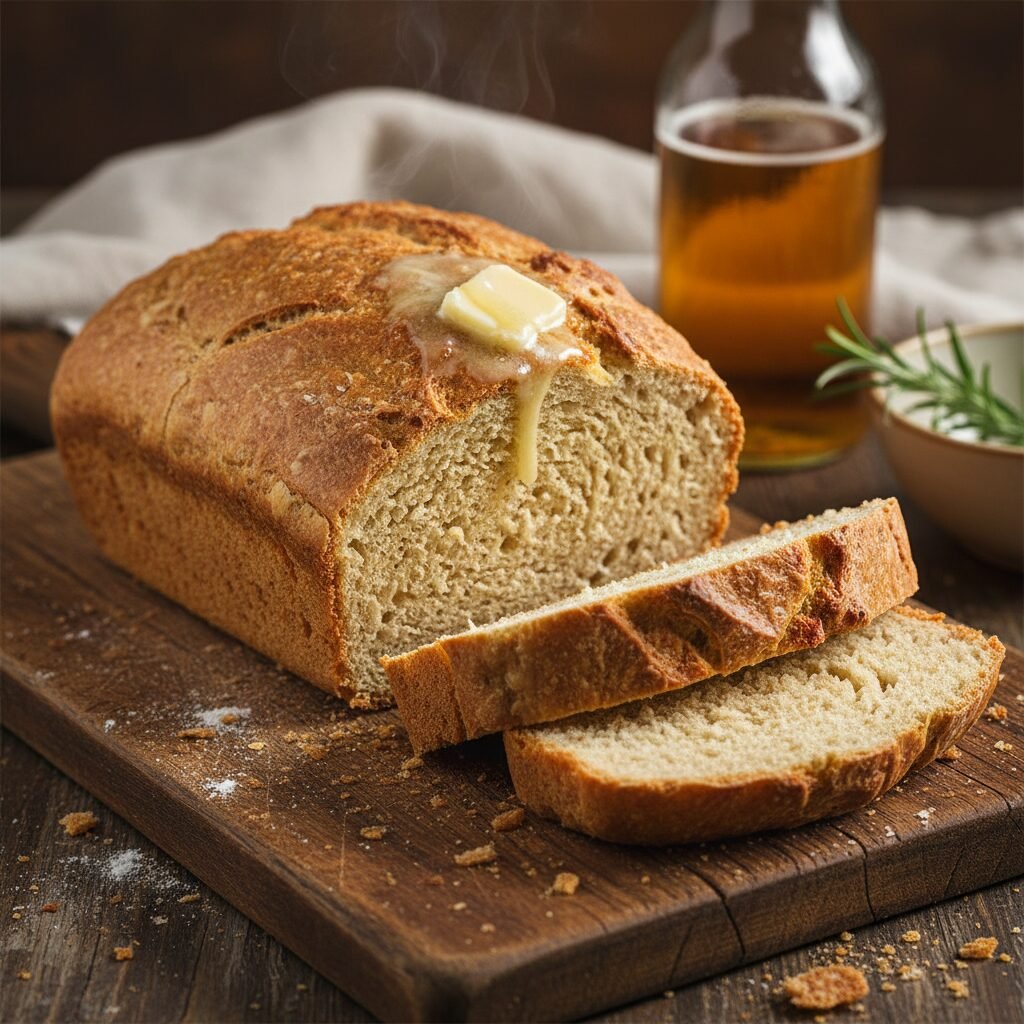
Furthermore, the alcohol in the beer evaporates during the baking process, leaving behind a deep, earthy, and yeasty flavor that mimics a traditional sourdough or long-fermented loaf, without the days of waiting. And let’s not forget the butter! Pouring melted butter over the top (or into the pan) essentially fries the crust as it bakes, creating that signature crunchy, golden-brown exterior that contrasts perfectly with the tender crumb inside. It is culinary chemistry at its finest!
Why You’ll Love This Recipe
- ✓Ready in under an hour
- ✓No yeast or kneading required
- ✓Only 3 main ingredients
- ✓Kid-friendly and customizable
- ✓Perfect crunchy buttery crust
- ✓Great for dipping in soups and chili
Equipment You’ll Need
- ✓9×5 inch Loaf Pan
- ✓Large Mixing Bowl
- ✓Silicone Spatula
- ✓Measuring Cups
- ✓Pastry Brush
Ingredients
- ✓3 cups Self-Rising Flour (See notes for substitution)
- ✓1/4 to 1/2 cup Granulated Sugar (depending on sweetness preference)
- ✓12 oz Beer (1 standard bottle or can, room temperature is best)
- ✓1/2 cup Salted Butter, melted (divided use)
Instructions
- Preheat and Prep: Preheat your oven to 375°F (190°C). Take your loaf pan and grease it lightly with a little bit of butter or non-stick spray.
- Mix Dry Ingredients: In a large mixing bowl, whisk together the 3 cups of self-rising flour and the sugar. If you like a more savory bread, stick to 1/4 cup sugar; for a sweeter treat, go for the full 1/2 cup.
- Add the Beer: Pour the entire 12 oz bottle of beer into the flour mixture. It will foam up—this is the fun part!
- Stir Gently: Using a spatula, gently mix the ingredients together just until the flour is moistened. Do not overmix! The batter will be lumpy and thick, which is exactly what you want.
- The Butter Trick: Pour half of your melted butter (1/4 cup) into the bottom of your loaf pan. Spread the batter into the pan on top of the butter. Then, pour the remaining 1/4 cup of melted butter evenly over the top of the batter.
- Bake: Place the pan in the oven and bake for 45 to 55 minutes. You are looking for a golden-brown top and a toothpick inserted into the center should come out clean.
- Cool: Remove from the oven and let it sit in the pan for at least 10 minutes. This helps the structure set so it doesn’t crumble when you slice it. Turn it out onto a wire rack to cool completely (if you can wait that long!).
Expert Cooking Tips
- ✓Spoon and Level: When measuring flour, don’t scoop directly with the cup or you’ll pack it down and get too much flour, leading to a dry loaf. Spoon the flour into the measuring cup and level it off with a knife.
- ✓Beer Selection: A light lager or pale ale gives a mild flavor (great for picky eaters). A stout or porter will give a darker, richer, more intense bread. Hard ciders work too for a sweeter twist!
- ✓Room Temp Beer: If you can, let your beer sit out for 15 minutes before baking. Room temperature ingredients mix better and activate faster.
- ✓Don’t Overwork It: I cannot stress this enough—stir until just combined. Lumps are your friends here. Overmixing develops gluten which makes quick breads tough.
Substitutions and Variations
Don’t have Self-Rising Flour? No panic, mama! You can make your own in seconds. For every 1 cup of All-Purpose flour, add 1 1/2 teaspoons of baking powder and 1/4 teaspoon of salt. So for this recipe, you would use 3 cups AP flour, 4 1/2 tsp baking powder, and 3/4 tsp salt.
If you want to make this Alcohol-Free, you can absolutely swap the beer for a non-alcoholic beer or even a plain carbonated water (club soda). If using club soda, you might want to add an extra pinch of salt and maybe some herbs for flavor since you lose the ‘yeasty’ taste of the beer.
For a Dairy-Free version, simply swap the butter for a vegan butter substitute or even olive oil, though the crust texture will be slightly different with oil.
Common Mistakes to Avoid
The number one mistake people make with beer bread is overmixing the batter. If you stir it until it’s perfectly smooth, you will end up with a dense, rubbery loaf. Embrace the messiness! Another common issue is using a pan that is too small. This recipe fits a standard 9×5 loaf pan perfectly. If you use an 8×4, it might overflow or take much longer to cook in the middle. Lastly, cutting into the bread too soon allows all the steam to escape, which can dry out the loaf. Let it rest!
Serving Suggestions
This bread is a chameleon! Serve it warm with a generous smear of honey butter or cinnamon butter for a sweet treat. It is the ultimate dipper for beef chili, creamy potato soup, or spinach artichoke dip. Leftovers make incredible toast the next morning, and if you’re feeling adventurous, cube it up to make the most savory croutons for your salad or a base for a stuffing recipe!
Storage and Reheating Tips
Room Temperature: Store leftover bread in an airtight container or Ziploc bag at room temperature for up to 3 days. It actually stays moist quite well thanks to the butter.
Freezing: This bread freezes beautifully! Wrap the completely cooled loaf (or individual slices) tightly in plastic wrap, then a layer of aluminum foil. Freeze for up to 3 months. Thaw on the counter and toast before eating to revive that crust.
Nutrition Facts (Estimated)
| Serving Size | 1 Slice |
| Calories | 195 kcal |
| Fat | 8g |
| Saturated Fat | 5g |
| Unsaturated Fat | 2g |
| Trans Fat | 0g |
| Cholesterol | 20mg |
| Sodium | 380mg |
| Carbohydrates | 28g |
| Fiber | 1g |
| Sugar | 4g |
| Protein | 4g |
Frequently Asked Questions
Does the bread taste like alcohol?
Not really! Most of the alcohol evaporates during the baking process. It leaves behind a mild, yeasty, sourdough-like flavor. If you use a very dark beer like a stout, the flavor will be stronger, but a light beer like Coors or Bud Light is very subtle.
Can I use a craft beer or IPA?
You definitely can, but be careful with IPAs. Because they are very hoppy, they can sometimes turn the bread slightly bitter. I usually recommend malty beers, lagers, or brown ales for the best flavor profile.
Why is my beer bread chewy?
Chewy bread is almost always a result of overmixing. When you mix flour with liquid, gluten forms. The more you mix, the stronger the gluten gets. For quick breads, you want minimal gluten development.
Can I add cheese or herbs?
Oh my gosh, yes! Toss in a cup of shredded cheddar cheese and some chopped jalapeños for a spicy kick, or add rosemary and garlic powder for a savory Italian vibe. Mix these in with the dry ingredients before adding the beer.
Do I have to use sugar?
The sugar balances the bitterness of the beer and the baking powder. You can reduce it to 2 tablespoons if you really want, but I wouldn’t omit it entirely. You can also swap it for honey or maple syrup.
Why is the top of my bread hard?
That crunchy crust is actually the signature of this recipe! The butter poured over the top creates that texture. If you prefer a softer top, you can mix all the butter into the batter instead of pouring it over, or cover the bread with foil for the last 15 minutes of baking.
Can I use gluten-free flour?
Yes, but ensure you use a ‘Cup-for-Cup’ gluten-free flour blend that includes xanthan gum. You will also need to add the baking powder and salt since most GF flours aren’t ‘self-rising’. The texture will be denser than wheat bread.
Is this safe for kids to eat?
Yes! The alcohol content burns off significantly during the hour-long bake at high heat. It is widely considered safe for the whole family, but if you are strictly avoiding alcohol, use a non-alcoholic beer or club soda.
Conclusion
And there you have it, friends! The easiest, most foolproof bread recipe you will ever keep in your recipe box. I promise, once you make this Beer Bread one time, you will be hooked. It is the perfect solution for those hectic weeknights when you want to add a little something special to dinner without the extra work. I can’t wait to hear how yours turns out and what kind of beer you decided to use! Don’t forget to pin this recipe for later and tag me in your photos on Instagram!