Crockpot Pot Roast
Say goodbye to dry, tough meat forever! This slow cooker pot roast is practically magic—it transforms a humble chuck roast into a fall-apart tender feast with a rich, savory gravy that makes itself.
20 minutes
8 hours
8 hours 20 minutes
6-8 servings
Main Course
Slow Cooker
American
Gluten Free
Hey there, beautiful mamas! Let’s talk about that 5:00 PM panic. You know the one—where the kids are asking what’s for dinner, the laundry is piled high, and you have exactly zero energy left to stand over a stove. Enter my absolute favorite kitchen superhero: the Crockpot Pot Roast. There is something profoundly comforting about walking into your home after a long day and being greeted by the savory, herb-filled aroma of a roast that has been simmering away for hours. It smells like love, doesn’t it?
This isn’t just any pot roast recipe; this is the one that will make your mother-in-law ask for your secret. We are talking about beef so tender you can cut it with a spoon, carrots that are sweet and soft but not mushy, and potatoes that have soaked up all those incredible beefy juices. Plus, the gravy? Oh, the gravy! It is rich, glossy, and perfect for drizzling over everything on your plate. Whether you are prepping for a cozy Sunday supper or need a reliable “set it and forget it” meal for a manic Tuesday, this recipe is a total game-changer for your meal rotation.
I have tweaked this recipe over the years to ensure it is foolproof. No more gray, boiled-looking meat. We are building layers of flavor that make this taste like you spent all day cooking, even though your active prep time was just a few minutes in the morning. So, grab your apron and let’s make some comfort food magic!
History & Origins
Pot roast is one of those timeless dishes that feels like it has been around forever, and in a way, it has! The concept of “braising”—cooking tough cuts of meat slowly in liquid—dates back centuries across Europe. The term “pot roast” specifically is distinctly American, appearing in cookbooks as early as the 19th century. It was originally a method used by home cooks to make tougher, less expensive cuts of meat palatable and delicious.
Traditionally, this was done in a heavy Dutch oven or a cast-iron pot over a fire or on a stove (hence the name “pot” roast). Immigrants brought their own variations: French boeuf à la mode, German sauerbraten, and eventually, the New England Yankee pot roast, which popularized adding root vegetables directly into the pot. When the slow cooker (or Crock-Pot) became a kitchen staple in the 1970s, it revolutionized this dish for working moms everywhere. Suddenly, you didn’t need to tend a fire or watch a stove; electricity did the work, cementing the pot roast as the undisputed king of American comfort food.
Why This Recipe Works
You might be wondering, why does the slow cooker make such a difference? It all comes down to collagen. The best cut of meat for a pot roast is a chuck roast, which comes from the shoulder of the cow. It is a well-exercised muscle, meaning it is full of connective tissue. If you cooked this quickly like a steak, it would be tough and chewy.
However, when you cook it low and slow in a moist environment, that tough collagen breaks down into gelatin. This process not only makes the meat incredibly tender (that “fall-apart” texture we love) but also adds a rich, silky body to the cooking liquid, creating a natural gravy base. Additionally, by searing the meat before placing it in the slow cooker—a step known as the Maillard reaction—we create a crust of complex flavors that deepens the overall taste of the dish. The vegetables act as a rack for the meat, lifting it slightly so it doesn’t boil, while simultaneously absorbing the beef drippings. It is a perfect culinary ecosystem!
Why You’ll Love This Recipe
- ✓Fall-apart tender meat every single time
- ✓Rich, savory gravy made right in the pot
- ✓Complete meal in one pot with veggies included
- ✓Budget-friendly using affordable cuts of beef
- ✓Perfect for meal prepping and freezer meals
- ✓Minimal active prep time required
Equipment You’ll Need
- ✓6-quart (or larger) Slow Cooker
- ✓Large Skillet (cast iron preferred)
- ✓Chef’s Knife
- ✓Cutting Board
- ✓Tongs
- ✓Whisk
- ✓Small mixing bowl
Ingredients
- ✓3-4 lb Beef Chuck Roast (boneless, well-marbled)
- ✓2 tbsp Olive oil (or vegetable oil for high heat)
- ✓1 large Yellow onion, cut into thick wedges
- ✓1 lb Carrots, peeled and cut into 2-inch chunks
- ✓1.5 lbs Yukon Gold potatoes, cut into large chunks (leave skins on)
- ✓3 stalks Celery, cut into 2-inch pieces
- ✓4 cloves Garlic, minced
- ✓2 cups Beef broth (low sodium preferred)
- ✓1/2 cup Red wine (Cabernet or Merlot) OR extra beef broth
- ✓2 tbsp Tomato paste
- ✓1 tbsp Worcestershire sauce
- ✓1 tbsp Dried thyme (or 3 sprigs fresh)
- ✓1 tbsp Dried rosemary (or 2 sprigs fresh)
- ✓1 tsp Salt (plus more for seasoning meat)
- ✓1 tsp Black pepper (freshly cracked)
- ✓2 tbsp Cornstarch (optional, for thickening gravy)
- ✓2 tbsp Water (cold, for cornstarch slurry)
- ✓Fresh parsley for garnish
Instructions
- Prepare the Meat: Remove your chuck roast from the packaging and pat it completely dry with paper towels. This is crucial for a good sear! Generously season all sides with salt and cracked black pepper.
- Sear the Roast: Heat the olive oil in a large skillet over medium-high heat. Once the oil is shimmering, carefully place the roast in the pan. Sear for 4-5 minutes per side until a deep, dark brown crust forms. Do not skip this step—it adds so much flavor! Transfer the seared meat to a plate.
- Sauté Aromatics (Optional but Recommended): In the same skillet, reduce heat to medium. Add the onions and sauté for 2 minutes just to pick up the beef bits. Stir in the garlic and tomato paste, cooking for 1 minute until fragrant. Pour in the red wine (or a splash of broth) to deglaze the pan, scraping up the browned bits from the bottom.
- Layer the Slow Cooker: Place the potatoes, carrots, and celery at the bottom of your slow cooker bowl. This creates a natural rack for the meat.
- Combine: Place the seared roast on top of the vegetables. Pour the onion and wine mixture from the skillet over the beef. Add the beef broth, Worcestershire sauce, thyme, and rosemary.
- Slow Cook: Cover and cook on LOW for 8 to 10 hours (highly recommended) or on HIGH for 4 to 5 hours. The meat is done when it shreds easily with a fork.
- Make the Gravy: Once cooked, remove the beef and vegetables to a serving platter and cover with foil to keep warm. Turn the slow cooker to HIGH (or transfer liquid to a saucepan on the stove). Whisk the cornstarch and cold water in a small bowl to make a slurry. Stir this into the liquid in the pot. Let it cook for 10-15 minutes until thickened into a glossy gravy.
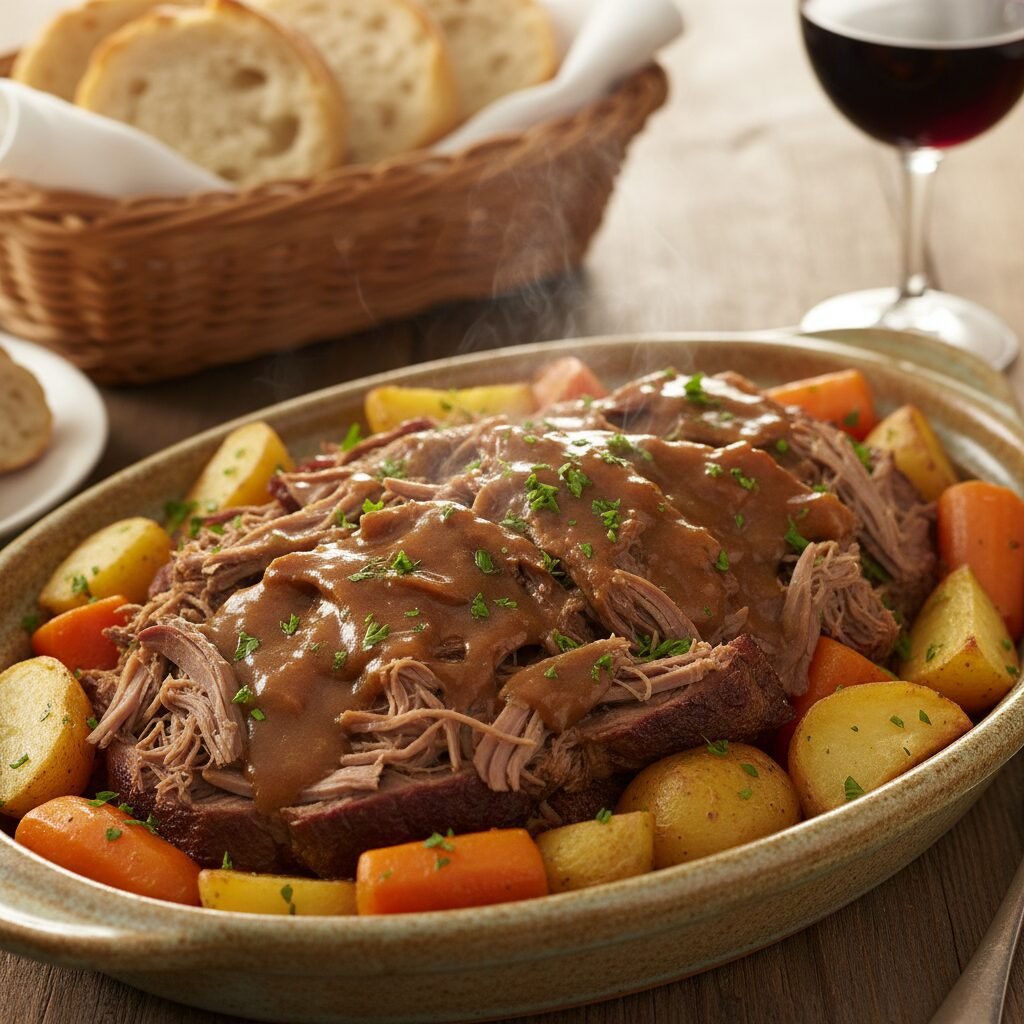
- Serve: Shred the beef or slice it against the grain. Serve alongside the tender veggies and drizzle generously with the gravy. Garnish with fresh parsley.
Expert Cooking Tips
- ✓Choose the Right Cut: Always look for ‘Chuck Roast’ or ‘Shoulder Roast’. Lean cuts like round roast will dry out and become tough in the slow cooker.
- ✓Don’t Cut Veggies Too Small: Because this cooks for a long time, cut your carrots and potatoes into large, chunky pieces so they don’t turn into mush.
- ✓Low is Best: For the most tender meat, the LOW setting is superior to HIGH. It gives the connective tissue more time to break down properly.
- ✓Deglaze the Pan: The brown bits stuck to the bottom of your skillet after searing are pure flavor gold (called fond). Using liquid to scrape them up ensures that flavor goes into your roast.
Substitutions and Variations
We all have those days where we are missing an ingredient or need to adapt for allergies. Here is how you can swap things out:
- Wine: If you don’t cook with alcohol, simply replace the red wine with an equal amount of beef broth, or even a splash of balsamic vinegar for acidity.
- Potatoes: I love Yukon Gold because they are buttery, but Russets work great too (peel them first). Baby red potatoes are also an excellent no-chop option.
- Gluten-Free: The recipe is naturally gluten-free provided your Worcestershire sauce is GF. Use cornstarch or arrowroot powder for the gravy thickener.
- Onion Soup Mix: If you are short on spices, you can use a packet of Lipton Onion Soup mix instead of the dried herbs and garlic. It’s a classic shortcut!
Common Mistakes to Avoid
The biggest heartbreak is a tough pot roast. Usually, this happens for one of two reasons: either you used a lean cut of meat (like a sirloin tip), or you didn’t cook it long enough. If your roast is tough after 8 hours, it likely just needs another hour! Don’t be afraid to keep going. Another mistake is lifting the lid too often. Every time you peek, you lose heat and steam, adding 20-30 minutes to the cooking time. Trust the process, mama!
Serving Suggestions
This pot roast is a meal in itself with the potatoes and carrots, but I love serving it with some crusty French bread or dinner rolls to sop up that amazing gravy. If you want to skip the potatoes in the pot, serve the meat over a bed of creamy mashed potatoes, egg noodles, or even polenta. A crisp green salad with a vinaigrette dressing cuts through the richness perfectly.
Storage and Reheating Tips
Fridge: Store leftovers in an airtight container for up to 3-4 days. The flavor actually gets better the next day!
Freezer: You can freeze the cooked meat and gravy for up to 3 months. However, potatoes tend to get a bit grainy when frozen and reheated, so I recommend eating those first or removing them before freezing.
Reheating: Reheat gently on the stove or in the microwave. If the gravy has thickened too much in the fridge, add a splash of water or broth to loosen it up.
Nutrition Facts (Estimated)
| Serving Size | 1 serving (approx 6oz meat + veggies) |
| Calories | 450 |
| Fat | 22g |
| Saturated Fat | 9g |
| Unsaturated Fat | 11g |
| Trans Fat | 0g |
| Cholesterol | 105mg |
| Sodium | 680mg |
| Carbohydrates | 25g |
| Fiber | 4g |
| Sugar | 4g |
| Protein | 38g |
Frequently Asked Questions
Can I put the roast in the slow cooker frozen?
No, it is not safe to put a large frozen piece of meat in the slow cooker. It spends too much time in the ‘danger zone’ temperature range where bacteria flourish. Always thaw your meat in the fridge beforehand.
Do I really have to sear the meat?
Technically, no. You can dump it all in raw and it will be edible. But for that deep, restaurant-quality richness, searing is absolutely worth the extra 10 minutes. It locks in flavor and texture.
Why is my roast tough?
If it’s tough, it’s likely undercooked! The magic breakdown of collagen happens over time. Put the lid back on and give it another hour. It should shred easily with a fork.
Can I add other vegetables?
Absolutely! Parsnips, turnips, and sweet potatoes are wonderful additions. Just keep the pieces large so they hold up during the long cook time.
How much liquid do I actually need?
You don’t need to submerge the roast. The meat and veggies release their own juices. About 2 to 3 cups of total liquid is plenty to create steam and braise the meat without boiling it.
Can I make this in an Instant Pot?
Yes! Sear on Sauté mode, then pressure cook on High for about 60-80 minutes (depending on size) with a natural release. Reduce liquid by about half since pressure cookers don’t evaporate.
What is the best red wine to use?
Dry red wines work best. Cabernet Sauvignon, Merlot, or Pinot Noir are great choices. Don’t use ‘cooking wine’ from the grocery aisle; use something drinkable!
My gravy is too thin, how do I fix it?
If the cornstarch slurry didn’t thicken it enough, you can simmer it longer with the lid off to reduce it, or make a second small batch of slurry and whisk it in. Be sure the liquid is bubbling hot for the thickener to activate.
Conclusion
There you have it, friends—the only Crockpot Pot Roast recipe you will ever need. It’s hearty, wholesome, and wraps your family in a warm hug from the inside out. I hope this meal brings your family around the table for some good conversation and full bellies. If you try this recipe, please snap a picture and tag me on Instagram or Pinterest! I love seeing your creations. Happy cooking!