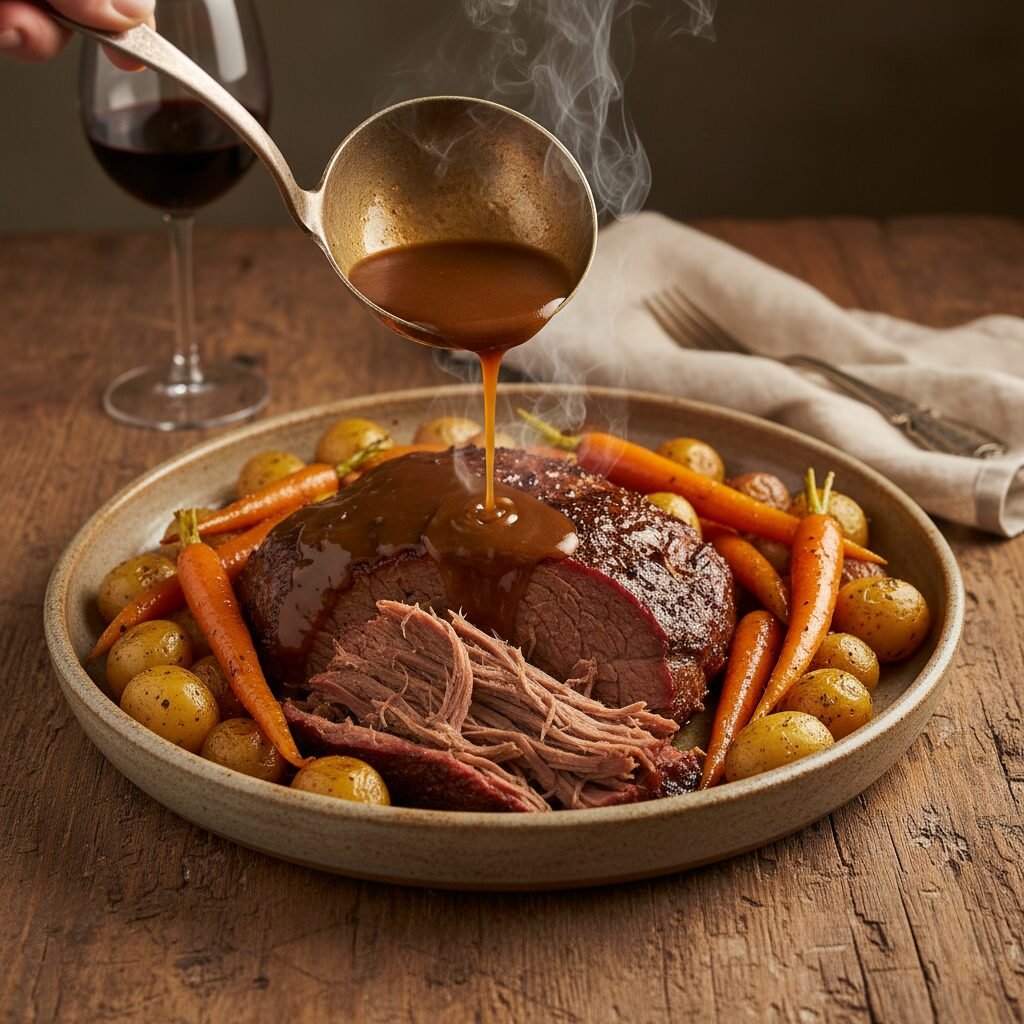
Instant Pot Pot Roast
Say goodbye to dry, tough meat and hello to the most succulent Sunday dinner you can make on a Tuesday night! This Instant Pot Pot Roast is a total game-changer for busy moms who crave that slow-cooked flavor without the all-day wait.
20 minutes
65 minutes
1 hour 45 minutes
6 Servings
Dinner
Instant Pot / Pressure Cooker
American
Gluten Free
There is something incredibly nostalgic about the smell of a pot roast wafting through the house. It reminds me of those lazy Sundays at Grandma’s, where the oven would be on for hours, warming up the kitchen and building anticipation for a hearty family meal. But let’s be real, mamas—who has 4 to 6 hours to babysit an oven these days? Between soccer practice, homework help, and just trying to keep the house from looking like a tornado hit it, time is our most precious commodity.
Enter the Instant Pot. If you know me, you know I was skeptical at first. Could a pressure cooker really replicate that fall-apart texture of a slow braise? The answer is a resounding YES. In fact, I’d argue it does it better. This recipe locks in all those savory juices and creates a gravy so rich and velvety, you could drink it with a straw (I won’t judge!).
This isn’t just a recipe; it’s a lifeline for busy weeknights when you need comfort food fast. We are talking about a complete meal with protein, starch, and veggies, all cooked in one pot, meaning fewer dishes for you to wash later. It is the ultimate ‘set it and forget it’ meal that tastes like you slaved away all day. Grab your apron, pour a glass of wine, and let’s make some magic happen!
History & Origins
Pot roast is a quintessential American comfort food, but its roots go deep into European culinary traditions, specifically the French method of ‘braising.’ Braising involves searing meat at a high temperature and then cooking it slowly in a covered pot with liquid. This method was essential historically for tenderizing tougher, more affordable cuts of meat, making it a staple for working-class families who needed to stretch their food budget.
Traditionally, this was done in a heavy Dutch oven over a hearth or in an oven for many hours. In New England, the ‘Yankee Pot Roast’ became famous for including root vegetables like carrots, potatoes, and turnips right in the pot. Fast forward to the 21st century, and the invention of the electric pressure cooker revolutionized this classic. What used to take an entire afternoon can now be achieved in under two hours, preserving the historical integrity of the flavor while adapting to the speed of modern life.
Why This Recipe Works
The science behind why the Instant Pot is superior for pot roast lies in the physics of pressure cooking. Pot roast typically uses a ‘chuck roast,’ a cut from the shoulder of the cow. This area is exercised frequently, making the meat tough with lots of connective tissue called collagen. In traditional cooking, you need low heat over a long period to melt that collagen into gelatin, which gives the meat its silky, succulent texture.
The Instant Pot raises the boiling point of water from 212°F to about 250°F. This higher temperature, combined with the high pressure, forces moisture into the meat and breaks down that tough collagen much faster than an oven or slow cooker ever could. Furthermore, by searing the meat first using the ‘Sauté’ function, we create the Maillard reaction—browning the proteins and sugars—which adds a depth of flavor to the gravy that simply dumping everything in raw cannot achieve.
Why You’ll Love This Recipe
- ✓Ready in under 2 hours compared to 6+ hours in a slow cooker
- ✓One-pot meal means minimal cleanup
- ✓Fork-tender meat every single time
- ✓Includes a rich, homemade gravy recipe
- ✓Budget-friendly using affordable cuts of meat
- ✓Perfect for meal prep and freezer meals
Equipment You’ll Need
- ✓6-quart or 8-quart Instant Pot
- ✓Tongs
- ✓Wooden Spoon (for deglazing)
- ✓Whisk
- ✓Small mixing bowl
- ✓Cutting Board
- ✓Chef’s Knife
Ingredients
- ✓3-4 lb Chuck Roast (boneless, trimmed of excess hard fat)
- ✓2 tbsp Olive Oil or Avocado Oil
- ✓1 large Yellow Onion, cut into large wedges
- ✓4 cloves Garlic, minced
- ✓1 cup Red Wine (Cabernet or Merlot) or extra Beef Broth
- ✓2 cups High-Quality Beef Broth or Bone Broth
- ✓2 tbsp Worcestershire Sauce
- ✓1 tbsp Balsamic Vinegar
- ✓1 tbsp Dried Thyme (or 3 sprigs fresh)
- ✓1 tbsp Dried Rosemary (or 2 sprigs fresh)
- ✓1.5 lbs Baby Potatoes (leave whole) or Yukon Gold (quartered)
- ✓4 large Carrots, peeled and cut into 2-inch chunks
- ✓2 tbsp Cornstarch + 2 tbsp Cold Water (for the slurry)
- ✓Salt and Black Pepper (generous amounts)
- ✓Fresh Parsley for garnish
Instructions
- Prepare the Meat: Take your chuck roast out of the fridge about 20 minutes before cooking to take the chill off. Cut it into 2 or 3 large chunks (this helps it cook evenly). Pat the meat completely dry with paper towels—this is crucial for a good sear! Generously season all sides with salt and pepper.
- Sear the Roast: Turn your Instant Pot to the ‘Sauté’ setting (High). Add the olive oil. Once the oil is shimmering hot, add the beef. Sear for 4-5 minutes per side until a dark brown crust forms. Do not skip this step! You may need to do this in batches. Remove meat and set aside on a plate.
- Sauté Aromatics: Add the onion wedges to the pot and cook for 2 minutes until slightly browned. Add the minced garlic and cook for just 30 seconds until fragrant.
- Deglaze the Pot: Pour in the red wine (or some beef broth). Using a wooden spoon, scrape up all the browned bits (fond) stuck to the bottom of the pot. Note: This prevents the dreaded ‘Burn’ notice and adds immense flavor. Let the wine simmer for 2 minutes to cook off the alcohol.
- Combine Ingredients: Press ‘Cancel’ to stop the Sauté function. Return the beef (and any juices on the plate) to the pot. Add the beef broth, Worcestershire sauce, balsamic vinegar, thyme, and rosemary.
- Pressure Cook the Meat: Lock the lid in place. Set the valve to ‘Sealing’. Select ‘Pressure Cook’ (or Manual) on High Pressure for 60 minutes (for a 3lb roast) to 75 minutes (for a 4lb roast).
- Natural Release: When the timer beeps, do not touch it! Let the pressure release naturally for at least 15 minutes. This rest period is vital for keeping the meat juicy. After 15 minutes, carefully vent any remaining pressure.
- Cook the Veggies: Open the lid. Remove the meat to a serving platter and tent with foil to keep warm. Add the potatoes and carrots to the liquid in the pot. Close the lid, set valve to Sealing, and cook on High Pressure for 4 minutes. Do a Quick Release immediately after the timer beeps so the veggies don’t turn to mush.
- Make the Gravy: Remove the cooked veggies with a slotted spoon and place them with the meat. Turn the Instant Pot back to ‘Sauté’. In a small bowl, whisk the cornstarch and cold water until smooth. Stir this slurry into the boiling liquid in the pot. Whisk constantly for 2-3 minutes until the gravy thickens.
- Serve: Taste the gravy and adjust salt/pepper if needed. Pour the luscious gravy over the roast and vegetables. Garnish with fresh parsley and serve hot!
Expert Cooking Tips
- ✓The Cut Matters: Always look for ‘Chuck Roast’. It has the perfect marbling of fat. Leaner cuts like ‘Round Roast’ will end up dry and tough.
- ✓Don’t Rush the Release: The natural pressure release (NPR) is actually part of the cooking process. If you quick release the meat immediately, the fibers tense up and squeeze out the juices, leaving you with dry meat.
- ✓Room Temp Meat: Cold meat hitting a hot pan lowers the temperature too fast. Letting it sit out for 20 minutes ensures a better sear.
- ✓Deglazing is Key: The Instant Pot has a sensor at the bottom. If burnt bits are stuck there, it will trigger a ‘Burn’ error and shut off. Scrape that bottom well!
- ✓Veggie Size: Cut your carrots and potatoes large (at least 2 inches). If they are too small, they will disintegrate under pressure.
Substitutions and Variations
No Wine? No problem! Just replace the red wine with an equal amount of additional beef broth. You can add a splash of apple cider vinegar to mimic the acidity the wine provides.
Gluten-Free: The recipe ingredients are naturally gluten-free, but ensure your Worcestershire sauce is a GF brand (like Lea & Perrins). Use cornstarch or arrowroot powder for thickening the gravy, not flour.
Potatoes: I love baby red potatoes or Yukon Gold because they hold their shape well and have a creamy texture. Avoid Russet potatoes if possible, as they tend to fall apart and get grainy in the pressure cooker.
Common Mistakes to Avoid
The biggest mistake people make is not seasoning enough. Potatoes and beef absorb a lot of salt, so don’t be shy. Another common pitfall is cooking the veggies with the meat for the full hour. If you put carrots and potatoes in for 60 minutes, you will open the pot to find baby food puree. Always cook the meat first, then do a short second cycle for the vegetables.
Serving Suggestions
This is a meal in itself, but I love serving it with some crusty sourdough bread to sop up that incredible gravy. If you opted to skip the potatoes in the pot, serve the roast over a bed of creamy garlic mashed potatoes or even egg noodles. A crisp green salad with a vinaigrette dressing cuts through the richness of the beef perfectly.
Storage and Reheating Tips
Fridge: Store leftovers in an airtight container for up to 4 days. The flavor actually improves the next day!
Freezer: This meal freezes beautifully. Freeze the meat and gravy in freezer-safe bags or containers for up to 3 months. I recommend freezing the veggies separately or making fresh ones, as cooked potatoes can sometimes change texture when frozen and reheated.
Nutrition Facts (Estimated)
| Serving Size | 1 serving (approx 6oz meat + veggies) |
| Calories | 450 |
| Fat | 22g |
| Saturated Fat | 9g |
| Unsaturated Fat | 11g |
| Trans Fat | 0g |
| Cholesterol | 105mg |
| Sodium | 680mg |
| Carbohydrates | 28g |
| Fiber | 4g |
| Sugar | 4g |
| Protein | 35g |
Frequently Asked Questions
Can I cook the roast from frozen?
Technically, yes, but I don’t recommend it. You can’t sear frozen meat, which means you lose a lot of flavor. If you must, skip the searing step and add 20-30 minutes to the cooking time.
Why is my roast tough?
If your pot roast is tough, it simply wasn’t cooked long enough. Put the lid back on and cook for another 10-15 minutes. Chuck roast needs time to break down.
What if I get the ‘Burn’ notice?
This usually means the fond (browned bits) wasn’t scraped up enough or there isn’t enough thin liquid. Release pressure, open the pot, scrape the bottom, add a little more broth, and try again.
Can I double the recipe?
Yes, as long as your pot is big enough (do not fill past the max line). The cooking time remains the same, but it will take longer to come to pressure.
Do I have to use a cornstarch slurry?
If you prefer a thinner broth (au jus style), you can skip it. For a thick gravy, cornstarch or arrowroot is necessary.
Can I use a rump roast instead?
Rump roast is leaner than chuck. It can dry out faster. If you use it, reduce the cooking time slightly and be sure to slice it very thinly against the grain.
How do I reheat leftovers without drying it out?
Reheat gently on the stovetop or in the microwave with the gravy. The gravy acts as a barrier to keep the moisture in.
Is this recipe Keto friendly?
The meat and gravy are! Just skip the potatoes and carrots, or swap them for radishes and green beans (adjust cook time for green beans to 1-2 mins).
Conclusion
There you have it, friends—the secret to a Sunday roast that fits into your crazy busy schedule. I hope this Instant Pot Pot Roast brings your family as much joy and comfort as it brings mine. There is nothing quite like gathering around the table for a hot, hearty meal that was made with love (and a little help from modern technology). If you try this recipe, please leave a comment below or tag me on Pinterest! I love seeing your creations. Happy cooking!