Roasted Root Vegetables
If you are looking for the absolute best way to get your family to eat their veggies, this is it! Sweet, savory, and perfectly golden, this sheet pan recipe turns ordinary roots into vegetable candy.
15 minutes
40 minutes
55 minutes
6 servings
Side Dish
Roasting
American
Gluten Free
Hello, beautiful friends! Is there anything more comforting than the smell of savory herbs and sweet vegetables roasting in the oven on a crisp day? I think not! As a busy mom, I am constantly on the hunt for side dishes that are low-effort but high-impact, and let me tell you, this Roasted Root Vegetable medley is the holy grail of dinner companions. It is vibrant, nutritious, and practically cooks itself while you help with homework or pour yourself a well-deserved glass of wine.
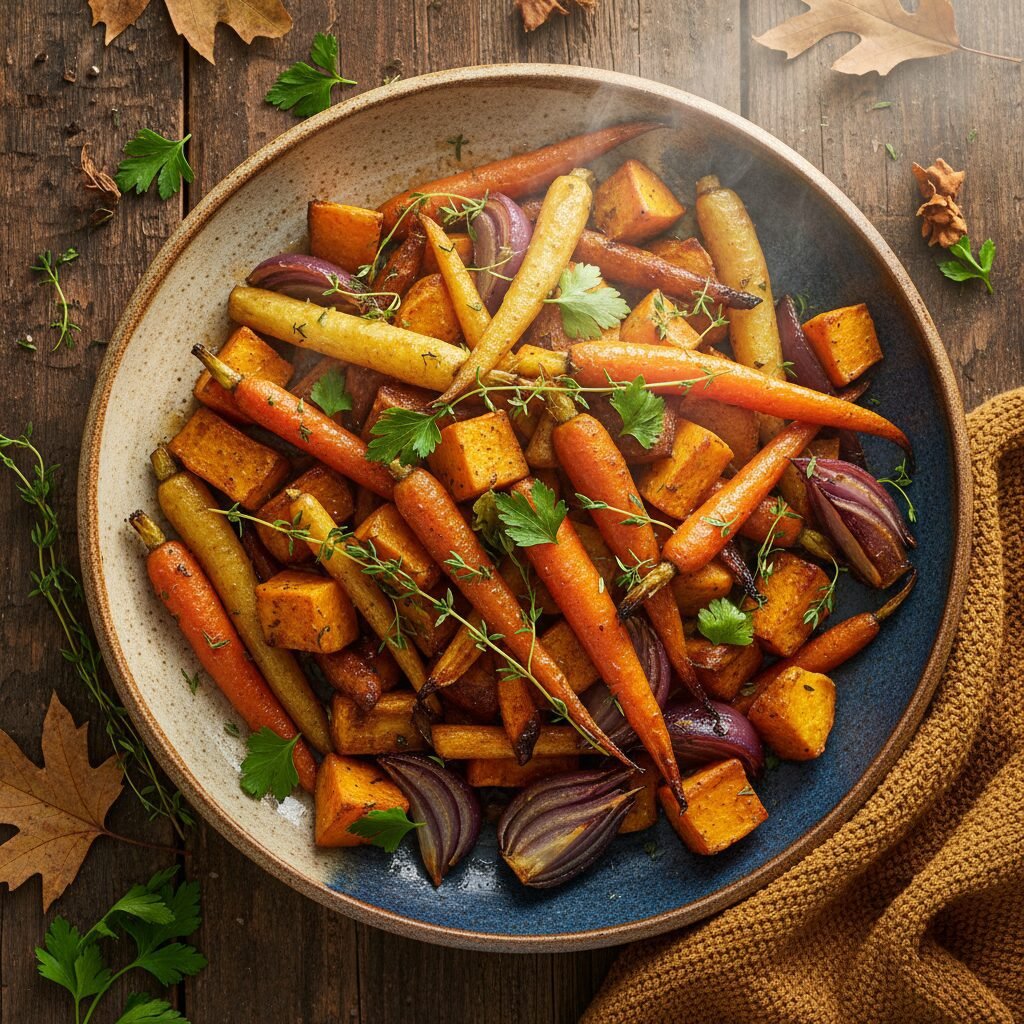
We are taking humble ingredients—carrots, parsnips, and sweet potatoes—and giving them the royal treatment. By roasting them at a high temperature, we coax out their natural sugars, creating those irresistible crispy, caramelized edges that everyone fights over. Tossed in a simple maple-thyme glaze, these veggies are sweet enough for the kids but sophisticated enough for a holiday feast. Whether you are meal prepping for the week or hosting Thanksgiving, this sheet pan wonder is about to become your new go-to.
Whatever you do, don’t skip the fresh herbs! They truly elevate this dish from ‘just roasted veggies’ to a restaurant-quality experience right in your own kitchen.
History & Origins
Root vegetables have been a dietary staple for centuries, primarily because of their incredible shelf life. Long before modern refrigeration, families relied on root cellars to keep potatoes, carrots, parsnips, and turnips fresh throughout the harsh winter months. Historically, these sturdy vegetables were often boiled or stewed, which provided sustenance but often left them mushy and lacking in flavor—a reputation they have unfairly carried for generations!
The culinary shift toward roasting root vegetables is a relatively modern appreciation in home cooking. While roasting meats was common, vegetables were often an afterthought. However, as French culinary techniques trickled down into everyday homes, we learned that dry heat cooking (roasting) transforms the starch in these tubers into sugar. Today, roasted root vegetables are celebrated not just as survival food, but as a delicacy that highlights the bounty of the earth, connecting us back to the seasonal rhythms of harvest time.
Why This Recipe Works
The secret to this recipe lies in the science of the Maillard reaction and caramelization. When you roast root vegetables at a high temperature (we are using 400°F/200°C), the amino acids and reducing sugars in the vegetables react, creating complex flavors and that beautiful brown browning. Unlike boiling or steaming, which adds water, roasting evaporates moisture, concentrating the natural flavor of the vegetable.
Furthermore, cutting the vegetables into uniform sizes ensures they cook at the same rate, preventing some pieces from turning to mush while others remain raw. The addition of maple syrup doesn’t just add sweetness; the sugar in the syrup aids in the browning process, creating a sticky, glossy glaze that clings to the herbs and spices. Finally, using a large baking sheet prevents overcrowding. If the veggies are piled on top of each other, they will steam instead of roast. Giving them space allows the hot air to circulate, guaranteeing those crispy edges we all crave.
Why You’ll Love This Recipe
- ✓Naturally gluten-free and vegan-friendly
- ✓One-pan cleanup for easy weeknight cooking
- ✓High in fiber and vitamins A and C
- ✓Perfect balance of sweet and savory flavors
- ✓Kid-approved sweetness from the maple glaze
- ✓Beautiful presentation for holiday tables
Equipment You’ll Need
- ✓Large rimmed baking sheet (or two)
- ✓Parchment paper
- ✓Sharp chef’s knife
- ✓Vegetable peeler
- ✓Large mixing bowl
Ingredients
- ✓3 large carrots, peeled and cut into 1-inch chunks
- ✓2 large parsnips, peeled and cut into 1-inch chunks
- ✓1 large sweet potato, unpeeled, scrubbed and cubed
- ✓1 lb baby red potatoes, halved
- ✓1 medium red onion, cut into wedges
- ✓3 tablespoons extra virgin olive oil
- ✓2 tablespoons pure maple syrup
- ✓1 tablespoon fresh thyme leaves (or 1 tsp dried)
- ✓1 tablespoon fresh rosemary, chopped
- ✓1 teaspoon kosher salt
- ✓1/2 teaspoon black pepper
- ✓Fresh parsley for garnish
Instructions
- Preheat and Prep: Preheat your oven to 400°F (200°C). Line a large rimmed baking sheet with parchment paper for easy cleanup. Trust me, you do not want to be scrubbing caramelized sugar later!
- Chop the Veggies: Wash and peel your vegetables. Cut the carrots, parsnips, sweet potatoes, and red potatoes into uniform 1-inch chunks. Try to keep them roughly the same size so they cook evenly.
- Season: Place all the chopped vegetables (including the red onion wedges) into a large mixing bowl. Drizzle with the olive oil and maple syrup. Sprinkle with the fresh thyme, rosemary, salt, and pepper.
- Toss to Coat: Use your hands or a large spoon to toss everything together until every single piece of vegetable is glistening and coated in the herb mixture.
- Spread on Pan: Pour the vegetables onto your prepared baking sheet. Spread them out in a single layer. Note: If your pan looks crowded, use two pans. Crowding leads to steaming, and we want roasting!
- Roast: Place in the oven and roast for 20 minutes.
- Flip: Remove the pan from the oven and gently toss/flip the vegetables with a spatula to ensure even browning. Return to the oven.
- Finish: Roast for another 15-20 minutes, or until the vegetables are tender when pierced with a fork and the edges are golden brown and caramelized.
- Serve: Transfer to a serving platter, garnish with fresh parsley if desired, and serve hot. Enjoy!
Expert Cooking Tips
- ✓Uniform Cuts: The most critical step is cutting your veggies to the same size. If the carrots are huge and the sweet potatoes are tiny, you will end up with burnt potatoes and crunchy carrots.
- ✓Don’t Skimp on Oil: The oil conducts the heat. If the veggies look dry, add another splash. This creates that mouthwatering crust.
- ✓High Heat is Best: Don’t be afraid of 400°F or even 425°F. Low heat (350°F) will just bake them slowly and you’ll miss out on the caramelization.
- ✓Add Beets Later: If you want to add red beets, toss them in oil separately and place them in a specific corner of the pan, otherwise, everything will turn pink!
Substitutions and Variations
This recipe is incredibly versatile! No parsnips? Just use more carrots. Not a fan of sweet potatoes? Swap them for butternut squash cubes (just add them in the last 25 minutes as they cook faster). If you don’t have maple syrup, honey works beautifully, though it makes the recipe non-vegan. You can also swap fresh herbs for dried Italian seasoning if your pantry is running low—just use one-third of the amount called for.
Common Mistakes to Avoid
The biggest mistake people make is overcrowding the pan. I cannot stress this enough, mamas! When vegetables touch, they release moisture that gets trapped, resulting in soggy, steamed veggies rather than crisp, roasted ones. Use two pans if you need to; rotate them halfway through cooking. Another mistake is undercooking. Root vegetables are dense; give them the full time to become tender on the inside and caramelized on the outside.
Serving Suggestions
These roasted gems are the ultimate side dish. They pair beautifully with a classic Roast Chicken, grilled steak, or your holiday Turkey. For a vegetarian main, serve them over a bowl of quinoa or farro with a dollop of goat cheese and a drizzle of balsamic glaze. They are also fantastic tossed into a kale salad for a hearty warm lunch.
Storage and Reheating Tips
Leftovers store wonderfully, making this a meal-prep champion. Store in an airtight glass container in the refrigerator for up to 4-5 days. To reheat, I recommend popping them back in the oven or an air fryer at 350°F for 5-10 minutes to crisp them back up. Microwaving works, but they will be softer.
Nutrition Facts (Estimated)
| Serving Size | 1 cup |
| Calories | 185 kcal |
| Fat | 7g |
| Saturated Fat | 1g |
| Unsaturated Fat | 5g |
| Trans Fat | 0g |
| Cholesterol | 0mg |
| Sodium | 240mg |
| Carbohydrates | 28g |
| Fiber | 5g |
| Sugar | 12g |
| Protein | 2g |
Frequently Asked Questions
Can I cut the vegetables ahead of time?
Absolutely! You can peel and chop the carrots and parsnips up to 2 days in advance. Store them in water in the fridge to keep them crisp, but dry them thoroughly before roasting. Sweet potatoes and potatoes are best cut right before cooking to prevent browning.
Why are my roasted vegetables soggy?
Soggy veggies usually happen for two reasons: the pan was overcrowded, or the oven temperature was too low. Make sure there is space between the pieces and your oven is hot!
Do I have to peel the carrots and parsnips?
You don’t have to! If you scrub them very well, the skins are perfectly edible and contain nutrients. However, for a more refined look and smoother texture, I usually peel them.
Can I use frozen root vegetables?
I don’t recommend it for roasting. Frozen vegetables release a lot of water and will never get that crispy, caramelized exterior. Fresh is definitely best here.
What other vegetables can I add?
Brussels sprouts, butternut squash, turnips, rutabaga, and whole garlic cloves are all excellent additions. Just be mindful of cooking times; softer veggies like squash need less time.
Is this recipe spicy?
Not at all! It is savory and sweet. If you want a kick, try adding a pinch of cayenne pepper or red pepper flakes to the oil mixture.
Can I make this oil-free?
Technically yes, you can roast them on a silicone mat without oil, but the texture will be dry and leathery rather than crisp and tender. The oil is essential for the roasting process.
How do I know when they are done?
They are done when you can easily pierce the largest chunk with a fork, and the edges are showing dark golden-brown spots.
Conclusion
I hope this Roasted Root Vegetable recipe brings as much warmth and color to your table as it does to mine. It is one of those simple pleasures—turning basic ingredients into something truly spectacular with just a little heat and time. Don’t forget to pin this recipe for your next Sunday dinner or holiday gathering! If you make it, I’d love to see it—tag me on Instagram so I can share your beautiful creations!