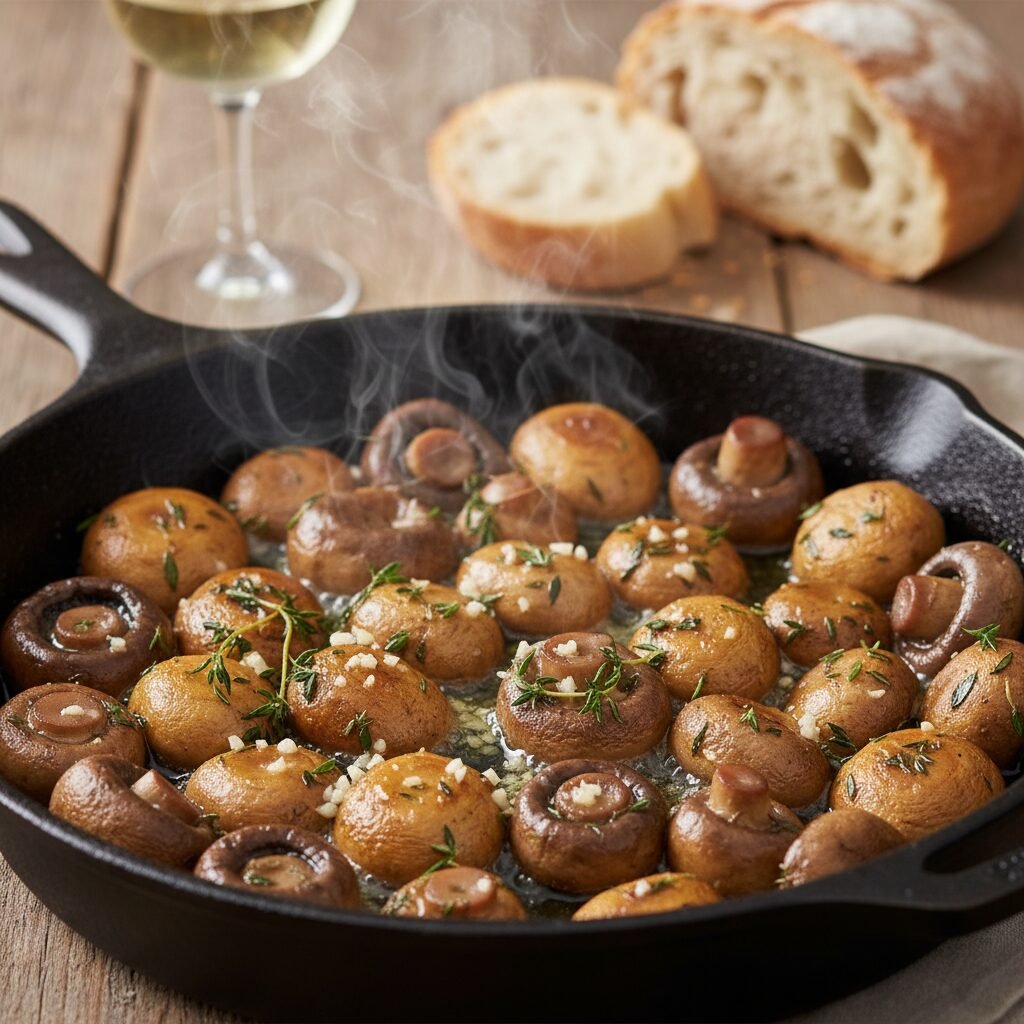
Sauteed Mushrooms
If you have ever wondered why restaurant mushrooms taste so much better than the ones you make at home, I am about to share the secret! These garlic butter sautéed mushrooms are perfectly golden, never soggy, and packed with incredible savory flavor.
10 minutes
15 minutes
25 minutes
4 servings
Side Dish
Sauté
American / French
Gluten Free
Hey friends! Welcome back to my kitchen. Today we are tackling a side dish that I honestly believe deserves a main stage spotlight: Sautéed Mushrooms. I know, I know—mushrooms can be a polarizing topic at the dinner table. You either love them, or you had a bad experience with a rubbery, soggy mushroom once and swore them off forever. But stick with me, because I am going to change your mind today!
For years, I struggled to get that deep, rich, steakhouse-style flavor at home. My mushrooms always turned out gray and watery, swimming in liquid rather than browning nicely. It was frustrating! But after a little culinary detective work (and a lot of trial and error), I discovered the golden rules of mushroom cooking. It turns out, it’s not about the recipe complexity; it is all about the technique.
This recipe is my go-to for busy weeknights because it comes together in under 15 minutes. It is elegant enough to serve alongside a fancy holiday ribeye but simple enough to pile on top of a Tuesday night burger or toss into a quick pasta. Plus, it is naturally low-carb and gluten-free, which is a huge win for my meal prep routine. Get your skillets ready, because your kitchen is about to smell amazing!
History & Origins
Mushrooms have been a staple in human diets for thousands of years, dating back to ancient Egypt where they were considered a plant of immortality and reserved only for royalty. Can you imagine? Commoners weren’t even allowed to touch them! In terms of the sauté technique, we have the French to thank for perfecting the art of cooking fungi in butter. The word sauté literally means ‘to jump’ in French, referring to the tossing motion of the food in the pan. While wild mushrooms were gathered for centuries, the cultivation of the common button mushroom (Agaricus bisporus) began in France in the 1600s inside underground caves. Today, we are lucky enough to grab a carton of beautiful Cremini or White Buttons at any local grocery store, bringing a touch of that royal history right to our dinner tables.
Why This Recipe Works
The science behind why this recipe works lies in moisture control and the Maillard reaction. Mushrooms are essentially biological sponges composed of about 90% water. When you throw them into a cool pan or crowd them too closely together, they release that water rapidly. Instead of searing, they end up steaming in their own juices, leading to that dreaded rubbery texture.
This recipe works because we use high heat and plenty of space in the pan. By allowing the mushrooms to sear undisturbed, the water evaporates immediately upon contact with the hot pan, allowing the sugars and proteins on the surface to caramelize. We also wait to add salt until the very end. Salt draws out moisture, so salting too early prevents browning. Finally, finishing with butter and garlic at the end ensures those delicate flavors don’t burn during the high-heat searing process. It is a foolproof method for culinary success!
Why You’ll Love This Recipe
- ✓Ready in under 20 minutes
- ✓Restaurant-quality caramelization
- ✓Keto and Low-Carb friendly
- ✓Vegetarian and Gluten-Free
- ✓Versatile side dish for any protein
Equipment You’ll Need
- ✓Large Cast Iron Skillet or Heavy-Bottomed Pan
- ✓Chef’s Knife
- ✓Cutting Board
- ✓Wooden Spoon or Spatula
Ingredients
- ✓1 lb (450g) Cremini or Baby Bella mushrooms
- ✓2 tablespoons olive oil
- ✓2 tablespoons unsalted butter, divided
- ✓3 cloves garlic, minced
- ✓1 teaspoon fresh thyme leaves (or 1/2 tsp dried)
- ✓1 tablespoon soy sauce (or tamari for GF)
- ✓1 tablespoon dry white wine (optional, for deglazing)
- ✓Salt and freshly cracked black pepper to taste
- ✓Fresh parsley, chopped (for garnish)
Instructions
- Prep the Mushrooms: Clean the mushrooms by wiping them with a damp paper towel. Do not soak them in water! Slice off the tough stem ends. You can either slice the mushrooms thickly or leave them quartered if they are small.
- Heat the Pan: Place a large skillet (cast iron is best) over medium-high heat. Add the olive oil and 1 tablespoon of the butter. Wait until the butter is melted and foaming.
- Sear the Mushrooms: Add the mushrooms to the pan. Important: Spread them out in a single layer. If your pan is too small, cook them in two batches. Do not crowd the pan!
- The Waiting Game: Let the mushrooms cook undisturbed for about 3-5 minutes. Resist the urge to stir! You want the bottoms to turn a deep, golden brown.
- Flip and Continue: Once the bottoms are browned, give the mushrooms a toss. Continue cooking for another 3-5 minutes until they are browned on all sides and tender.
- Add Aromatics: Reduce the heat to medium. Add the remaining tablespoon of butter, minced garlic, and thyme. Sauté for 1 minute until the garlic is fragrant (be careful not to burn it).
- Deglaze and Season: Stir in the soy sauce and white wine (if using). Use your spoon to scrape up any browned bits from the bottom of the pan. Let the liquid evaporate, which should take about 1 minute.
- Finish: Remove from heat. Season with salt and pepper to taste. (Remember, soy sauce is salty, so taste first!). Garnish with fresh parsley and serve immediately.
Expert Cooking Tips
- ✓Don’t Wash with Water: Mushrooms absorb water like a sponge. If you wash them under the tap, they will steam instead of sear. Just wipe them clean with a damp cloth.
- ✓Listen to the Pan: You should hear a vigorous sizzle when the mushrooms hit the pan. If it goes quiet, your heat is too low or you overcrowded the pan.
- ✓Salt Last: Salt draws out moisture. To get that beautiful brown crust, only add salt at the very end of the cooking process.
- ✓Use a Mix: For more depth of flavor, try using a mix of mushrooms like Cremini, Shiitake, and Oyster mushrooms.
Substitutions and Variations
Cooking is all about flexibility! Here are some swaps you can make:
- Mushrooms: I love Cremini (Baby Bellas) for their earthiness, but standard White Button mushrooms work well too. For a fancy twist, use Shiitake or Oyster mushrooms.
- Soy Sauce: This adds umami depth. If you are soy-free, coconut aminos work perfectly. You can also use Worcestershire sauce (just check if it’s vegetarian if that matters to you).
- Herbs: Thyme is classic, but rosemary or sage are delicious in the fall. In the spring, I love using fresh chives or tarragon.
- Dairy-Free: Swap the butter for a high-quality vegan butter or just stick to all olive oil.
Common Mistakes to Avoid
The biggest mistake people make is overcrowding the pan. I cannot stress this enough! If the mushrooms are piled on top of each other, the moisture released from the bottom layer gets trapped by the top layer, creating a steam bath. This results in grey, rubbery mushrooms. Cook in batches if you have to! Another common mistake is burning the garlic. Garlic burns very quickly, which is why we add it only in the last minute of cooking after the mushrooms are already browned.
Serving Suggestions
These mushrooms are incredibly versatile! Here is how my family enjoys them:
- Steakhouse Style: Pile them high on top of a grilled ribeye or sirloin steak.
- Burger Topper: Melt some Swiss cheese over a burger patty and top with these mushrooms for a mushroom-swiss burger.
- Toast: Serve over thick slices of sourdough toast with a poached egg for a savory brunch.
- Pasta: Toss them into fettuccine alfredo or a simple garlic and olive oil pasta dish.
- Bowl Meal: Add them to a quinoa or rice bowl with roasted veggies and chicken.
Storage and Reheating Tips
If you are lucky enough to have leftovers (we rarely do!), store them in an airtight container in the refrigerator for up to 3-5 days. To reheat, I recommend tossing them back in a hot skillet for a minute or two to wake up the texture. You can microwave them, but they might get a little soft. I do not recommend freezing them, as the texture becomes quite mushy upon thawing.
Nutrition Facts (Estimated)
| Serving Size | 0.5 cup |
| Calories | 115 kcal |
| Fat | 10g |
| Saturated Fat | 6g |
| Unsaturated Fat | 3g |
| Trans Fat | 0g |
| Cholesterol | 25mg |
| Sodium | 250mg |
| Carbohydrates | 4g |
| Fiber | 1g |
| Sugar | 1g |
| Protein | 3g |
Frequently Asked Questions
Can I wash the mushrooms under the faucet?
It is best not to. Mushrooms are very porous and will absorb that water, making them soggy when cooked. A damp paper towel is the best tool for cleaning.
Why are my mushrooms rubbery?
This usually happens because the heat was too low or the pan was too crowded, causing them to steam rather than sauté.
Can I use canned mushrooms?
I strongly recommend fresh mushrooms for this recipe. Canned mushrooms have a completely different texture and won’t caramelize the same way.
Is this recipe gluten-free?
Yes! Just make sure to use a gluten-free Tamari instead of traditional soy sauce, as some soy sauces contain wheat.
Do I have to use wine?
Not at all. The wine adds a nice acidity to cut the richness, but you can substitute it with a splash of vegetable broth or just skip it entirely.
Can I make this ahead of time?
These are definitely best served fresh off the stove. However, you can slice and prep all the ingredients hours in advance to make dinner time faster.
What is the best pan to use?
A cast-iron skillet is my favorite because it holds heat incredibly well, which is crucial for a good sear. Stainless steel is a close second.
Can I use garlic powder instead of fresh garlic?
In a pinch, yes. Use about 1/2 teaspoon of garlic powder, but add it with the salt and pepper at the end so it doesn’t burn.
Conclusion
There you have it—the secret to making the most mouthwatering, golden-brown sautéed mushrooms right in your own kitchen. I hope this recipe becomes a staple in your home just like it is in mine. It is amazing how a few simple ingredients and the right technique can transform a humble vegetable into something so luxurious. If you try this recipe, please leave a comment below or tag me on Instagram! I love seeing your creations. Happy cooking, mamas!