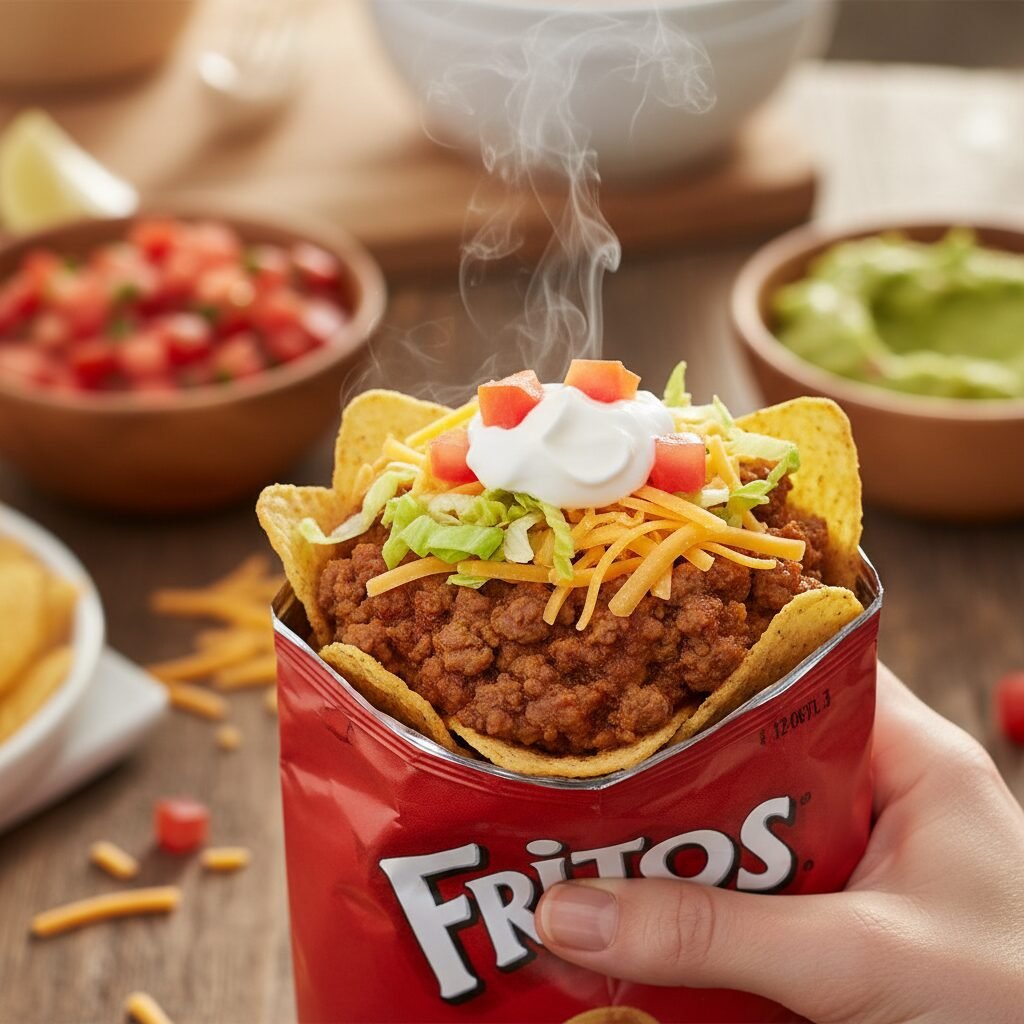
Walking Tacos
If you are looking for the ultimate crowd-pleaser that requires zero plates and minimal cleanup, you have found it! Walking Tacos are the fun, nostalgic, and absolutely delicious solution to feeding a hungry crowd without the hassle.
15 minutes
15 minutes
30 minutes
8-10 Servings
Main Dish
Stovetop / Assembly
American / Tex-Mex
Gluten Free
Hey friends! Let’s talk about one of my absolute favorite mom hacks for dinner time, birthday parties, and especially camping trips: Walking Tacos. If you grew up in the Midwest or the South, you might know these as ‘Frito Pies’ or ‘Tacos in a Bag,’ and just hearing the name probably brings back memories of Friday night football games, concession stands, and summer fairs.
But why wait for the county fair to enjoy this cheesy, crunchy goodness? Making Walking Tacos at home is incredibly easy, and let me tell you, it is a total game-changer for hosting. Imagine serving a hot, satisfying meal to twenty screaming kids (or hungry adults watching the Super Bowl) and having zero plates to wash afterward. Yes, you read that right! Because everything is eaten straight out of the chip bag, cleanup is practically non-existent.
The beauty of this recipe lies in its versatility. You set up a ‘Walking Taco Bar,’ keep the meat warm in a slow cooker, and let everyone build their own masterpiece. Whether you are a classic beef-and-cheese lover or you like to load it up with jalapeños and sour cream, every bag is customized to perfection. It’s fun, it’s interactive, and it’s honestly just delicious comfort food at its finest.
History & Origins
While the concept of the Walking Taco feels like a modern convenience, its roots actually go back quite a bit! Most food historians trace the lineage of the ‘Taco in a Bag’ back to the classic Frito Pie. The origins of the Frito Pie are a bit debated, but the most popular story credits Teresa Hernandez, who reportedly created the dish in the 1960s at the F.W. Woolworth’s lunch counter in Santa Fe, New Mexico. She poured her mother’s homemade red chili directly into a bag of Fritos, topped it with cheese and onions, and a legend was born.
Another claimant to the throne is the ‘Petro,’ served at the 1982 World’s Fair in Knoxville, Tennessee. It was essentially chili and toppings served in a Fritos bag. Over the decades, this concession stand staple migrated from fairs and rodeos to school cafeterias and eventually into our homes. The term ‘Walking Taco’ gained popularity because of the portability—you can literally walk around and socialize while eating your taco with a fork, making it the ultimate mobile meal for busy events.
Why This Recipe Works
Aside from the obvious convenience factor, there is a culinary reason why Walking Tacos are so addictive. It comes down to texture and temperature contrast. When you dump hot, savory, seasoned ground beef and melty cheese over room-temperature, crunchy corn chips, magic happens.
The corn chips (usually Fritos) have a distinct roasted corn flavor and a high salt content that stands up perfectly to the rich, spiced meat. Unlike a traditional hard taco shell that shatters and falls apart instantly, the thicker corn chips maintain their crunch for longer, even as they soak up some of the delicious taco juices. The cool crispness of the lettuce and the creamy coolness of the sour cream added on top provide the perfect balance to the hot meat, creating a symphony of flavors and textures in every bite.
Why You’ll Love This Recipe
- ✓Zero plates required means practically no cleanup!
- ✓Highly customizable for picky eaters and adventurous foodies alike.
- ✓Perfect for large crowds, parties, and camping trips.
- ✓Budget-friendly ingredients that feed a multitude.
- ✓Ready in under 30 minutes.
- ✓Nostalgic comfort food that everyone loves.
Equipment You’ll Need
- ✓Large Skillet or Sauté Pan
- ✓Wooden Spoon or Meat Chopper
- ✓Kitchen Shears (Scissors)
- ✓Slow Cooker (Optional, for keeping meat warm)
- ✓Plastic Forks (for serving)
Ingredients
- ✓2 lbs Lean Ground Beef (85/15 or 90/10 recommended)
- ✓1 medium Yellow Onion, finely diced
- ✓2 packets (1 oz each) Taco Seasoning (or homemade equivalent)
- ✓2/3 cup Water
- ✓10-12 Single-Serve Bags (1 oz) Corn Chips (Fritos or Doritos)
- ✓2 cups Shredded Cheddar or Mexican Blend Cheese
- ✓1 head Iceberg Lettuce, shredded
- ✓2 large Tomatoes, diced
- ✓1 cup Sour Cream
- ✓1 jar Salsa or Pico de Gallo
- ✓Optional: Sliced Jalapeños, Black Olives, Guacamole, Green Onions
Instructions
- Brown the Beef: Heat a large skillet over medium-high heat. Add the ground beef and the diced onion. Cook, breaking up the meat with a wooden spoon, until the beef is fully browned and the onions are translucent (about 7-10 minutes).
- Drain and Season: If there is excess grease in the pan, carefully drain it off. Return the pan to the heat. Sprinkle the taco seasoning packets over the meat and pour in the water. Stir well to combine.
- Simmer: Reduce the heat to low and let the meat mixture simmer for 5-7 minutes, or until the sauce has thickened and coated the meat beautifully. If you are hosting a party, transfer this mixture to a slow cooker on the ‘Warm’ setting now.
- Prep the Bags: While the meat is simmering, prepare your chip bags. gently squeeze each bag to slightly crush the chips (don’t pulverize them, just break them up a bit). Use kitchen shears to cut the bags open. You can cut straight across the top, or for a wider opening, cut the bag open lengthwise (down the side).
- Fold the Edges: Roll the cut edges of the bag down slightly to create a sturdier ‘bowl’ shape and prevent the bag from collapsing.
- Assemble: Spoon a generous portion (about 1/2 cup) of the taco meat directly over the chips in the bag. Immediately top with shredded cheese so it melts.
- Top it Off: Let everyone add their favorite cold toppings—lettuce, tomatoes, salsa, sour cream, etc. Stick a plastic fork right in the bag and serve!
Expert Cooking Tips
- ✓Meat Texture: Break the ground beef down into very small crumbles. Large chunks make it harder to eat out of a bag with a flimsy plastic fork.
- ✓The Chip Choice: While Fritos (corn chips) are traditional, Nacho Cheese Doritos are a huge hit with kids! Cool Ranch Doritos are also a fun twist.
- ✓Keep it Warm: If serving for a party, the slow cooker is essential. Taco meat can get cold and greasy fast; the crockpot keeps it perfect for hours.
- ✓Bag Prep: Cut the bags open with scissors rather than popping them open. It makes for a cleaner edge and easier eating.
- ✓Portion Control: Buy the 1 oz or 1.5 oz bags. The large ‘Grab Bag’ sizes (2.5 oz) are often too much chip-to-meat ratio for one person.
Substitutions and Variations
If you are looking to lighten things up, you can easily swap the ground beef for ground turkey or chicken; just add a splash of olive oil when browning since they are leaner. For a vegetarian version, use a plant-based meat crumble or even lentils and black beans seasoned with taco spices. If you can’t find single-serve bags, you can simply buy a family-size bag of chips and portion them out into small paper boats or bowls, though you lose a bit of the ‘bag’ novelty!
Common Mistakes to Avoid
The biggest mistake people make is not draining the grease from the beef. Since the food is contained in a non-porous foil bag, excess grease has nowhere to go and will pool at the bottom, making the last few bites an oily mess. Drain it well! Another mistake is overloading the bag. If you stuff too much meat and toppings in, it becomes impossible to stir without spilling everywhere. Leave a little room at the top for mixing.
Serving Suggestions
I love setting this up as a DIY Taco Bar. Put the bags in a large basket or crate. Place the meat in the slow cooker in the center. Then, use a muffin tin or small bowls to display all the toppings: shredded cheese, sour cream, salsa, guacamole, jalapeños, diced onions, cilantro, and lime wedges. Serve with a side of Mexican street corn (elote) or fresh fruit to round out the meal.
Storage and Reheating Tips
You can’t really store a fully assembled Walking Taco—the chips will get soggy very quickly. However, the taco meat stores beautifully! Keep leftover meat in an airtight container in the fridge for up to 4 days or freeze for up to 3 months. Store leftover toppings in separate containers. To reheat, just warm the meat in the microwave or on the stove and grab a fresh bag of chips!
Nutrition Facts (Estimated)
| Serving Size | 1 Bag with Toppings |
| Calories | 450 kcal |
| Fat | 28g |
| Saturated Fat | 10g |
| Unsaturated Fat | 14g |
| Trans Fat | 1g |
| Cholesterol | 65mg |
| Sodium | 890mg |
| Carbohydrates | 32g |
| Fiber | 3g |
| Sugar | 2g |
| Protein | 18g |
Frequently Asked Questions
Can I make the meat ahead of time?
Absolutely! In fact, the flavors often meld better the next day. Make the meat up to 2 days in advance and just reheat it in a slow cooker or on the stove before the party.
What size chip bags should I buy?
Look for the ‘Single Serve’ or ‘Lunch Box’ size, which are usually around 1 ounce. Avoid the larger ‘Big Grab’ bags unless you have very hungry teenagers, as they require a lot of meat to fill.
How much meat do I need per person?
A good rule of thumb is about 1/4 to 1/3 pound of uncooked meat per person, or roughly 1/2 cup of cooked taco meat per bag.
Are Walking Tacos gluten-free?
They can be! Original Fritos are generally gluten-free (always check the package), and if you use a gluten-free taco seasoning and pure ground beef, the meal is safe for gluten-sensitive guests.
Can I use Doritos instead of Fritos?
Yes! Many people actually prefer Doritos Walking Tacos. The Nacho Cheese flavor adds an extra cheesy kick that is delicious.
How do I cut the bags for kids?
For smaller kids, cutting the bag lengthwise (along the long side) creates a wider ‘bowl’ that is easier to eat from and less likely to tip over.
What is the best way to keep the toppings cold?
If you are outside or it’s a hot day, place your bowls of cheese, sour cream, and salsa into a larger tray filled with crushed ice.
Can I use chicken instead of beef?
Yes! Shredded rotisserie chicken mixed with taco seasoning and a little salsa makes a fantastic alternative to ground beef.
Conclusion
There you have it, friends! The easiest, most fun way to serve tacos to a crowd. Whether you are planning a graduation party, a kid’s birthday bash, or just a fun Friday night dinner, these Walking Tacos are guaranteed to be a hit. The combination of crunchy chips, savory meat, and cool toppings is just unbeatable. Plus, the lack of dishes to wash is a gift to moms everywhere! Give this recipe a try, and let me know in the comments if you are Team Fritos or Team Doritos!